
Damiano explains all necessary steps for Gg destruction in this complete report about his shot
https://vimeo.com/groups/kineticthought/videos/90065681
Inspiration
Looking at the latest catastrophe films, particularly “2012”, I was fascinated by destruction effects of extreme realism with the use of real models and dolly cameras, so I embarked on this challenge to explore and experiment with different VFX techniques in Maya while testing Pulldownit plugin in large-scale destruction, considering all stages to the final shot.
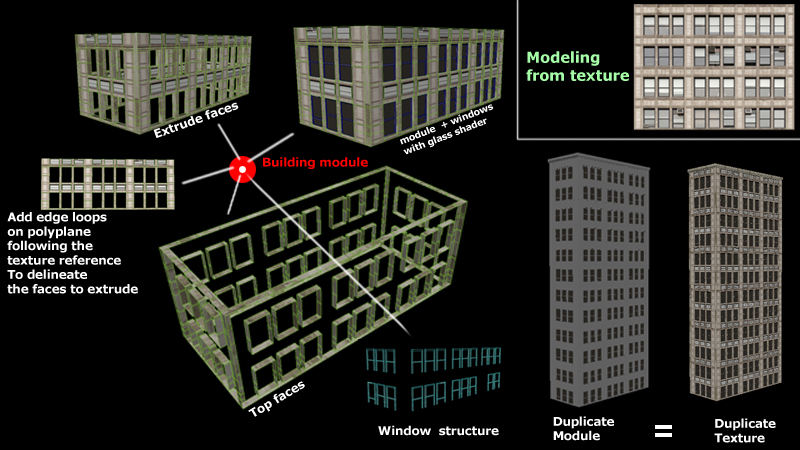
Modeling
All the buildings were modeled from real images, using high-resolution “CG textures” as reference. I projected each texture in a simple “polyPlane” in Maya and I started to add edge loop tool outlining the shapes of the windows and metal structures, following by extracting them ( “extract tool”) from the rest of the plane in order to manage the extrusion of faces separately, thus obtaining a shape on which to work. Then I gave different thickness to walls, glass and windows frames, assigning a reflective shader to glass, a metallic shader for the windows frames and a stone texture for the walls. Once I got one floor done, it was as easy as duplicate it to decide the number of floors per building.
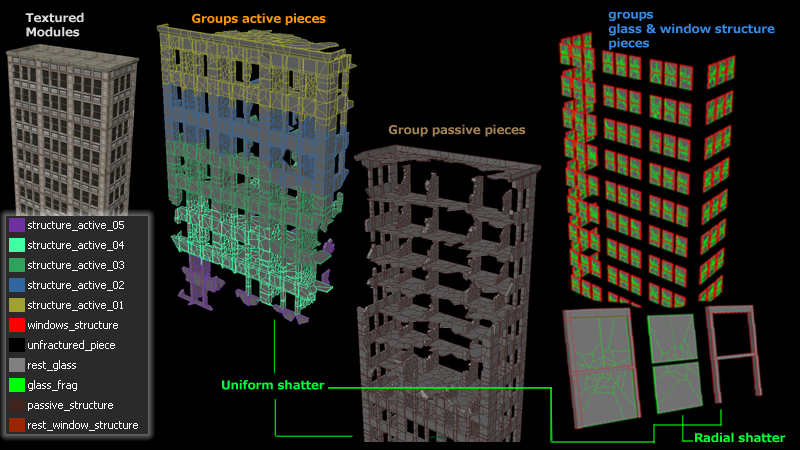
Shattering with Pulldownit
I applied initially an “uniform shatter” in 3 pieces to the walls and pillars of individual buildings, reshatering each big fragment in around 200 pieces again, checking “PDI cut” material option so as to be able to apply the same “stone texture” given to the original faces to the internal ones. Also I created a “quick selection set” to use this selection of faces in the future and made different groups with the fragments to can handle them independently in the PDI basic fractures panel.
For the windows I used “radial shatter” splitting each glass in 10 pieces and increasing the “Shatterit->noise” option to get a more realistic look. Windows frames were shattered in 5 pieces and grouped to be handled separately.
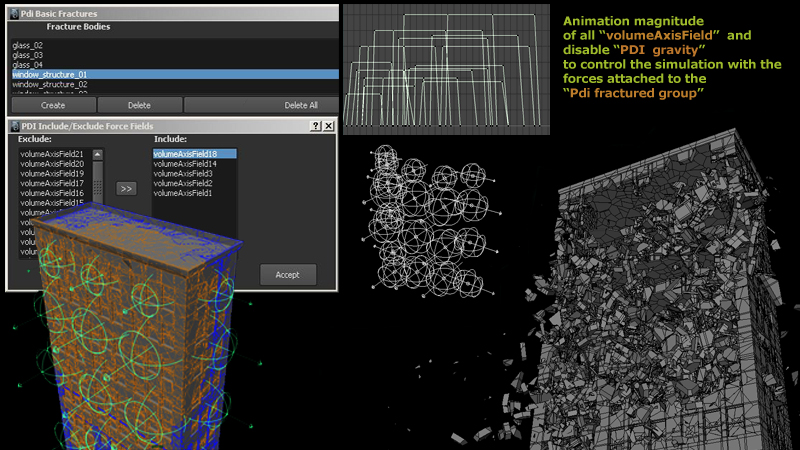
Dynamics with Pulldownit
At this point, I had diferent groups of fragments added to “Pdi basic fracture” panel, so the posibilities of making them break in diferent ways are many. After several experiments with a few pieces, I tried to control the activation of the fragments by placing different “volumeAxisFiels” along the walls and linking them to the PDI fracture groups, also disabling gravity in “PDI solver options” for tweaking the Maya fields only. I had to animate the fields’ magnitude to get a more organic look of destruction. After I was happy with the walls fracture I added the glass and windows frames groups to PDI basic fractures, assigning them a mass value much less than the one of the walls, and Pdi computed the whole destruction set in a short time indeed.

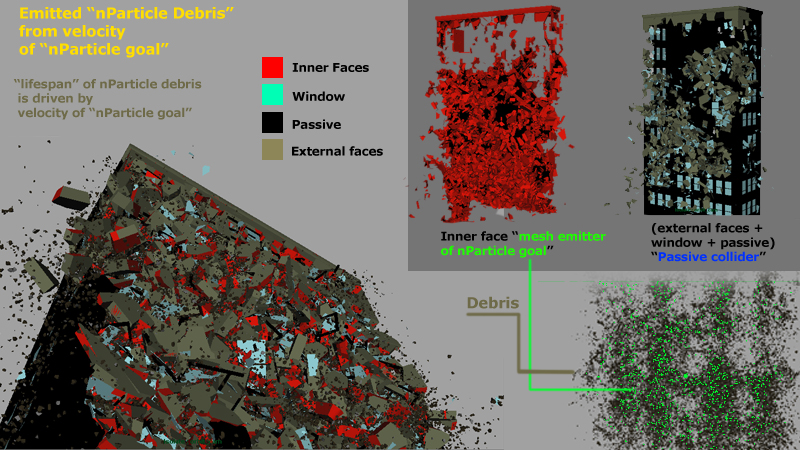
Emitting debris in Maya
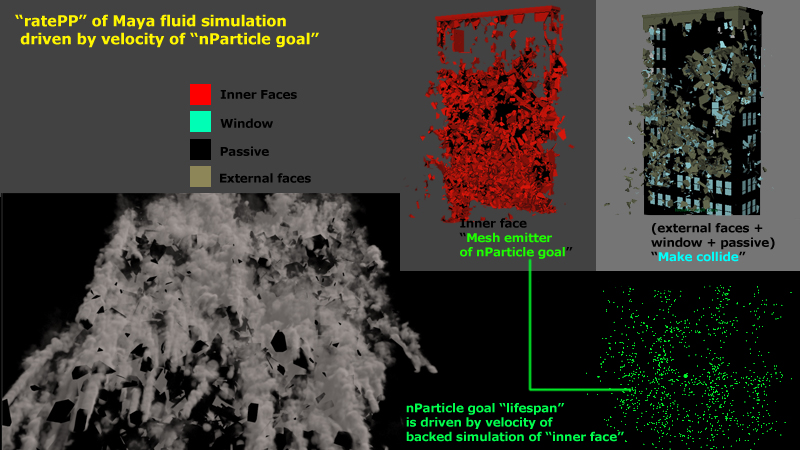
After the simulation with Pulldownit was done I made a Maya cache of all geometry, in order to select only the inner faces I used the “quick selection set” I had created previusly. To generate debris only from the pieces that start to activate, I emitted a first stage of “goal nParticles” from the “inner faces” by adding the property “goal” to constraint nParticles to the geometry and subsequently make the “velocity” of the geometry affecting the “lifespanPP” of the particles via “PPexpression”, the “debris” are then generated by new “nParticles” emmited from the first “goal nParticles” and constrained by the attribute “ratePP” velocity of the goal particle.
For instancing the particles as geometry I used again Pulldownit to break a polySphere in 200 pieces, assigning them to nParticles randomizing the scale and the index via “PPexpression”. Finally I activated collision between “nParticle debris” and the outer faces of the cached geometry.
Maya fluids simulation
Maya fluids emission was made in a similar way to the debris. First, I created a fluid emitter from the “goal particle” attached to the “inner face” and constrained by “PPexpression” attribute “ratePP” of the fluid emitter to the “lifespanPP” of the particle goal. In order to prevent smoke from passing through the walls I activated collisions between “fluid container” and “external faces” of the cached geometry.
I did a “fluid cache” setting resolution to “500” for the “fluid container.” This method allowed me to save time in the final calculation because I got a large fluid simulation only with one fluid emitter inside the container.

Rendering & Compositing
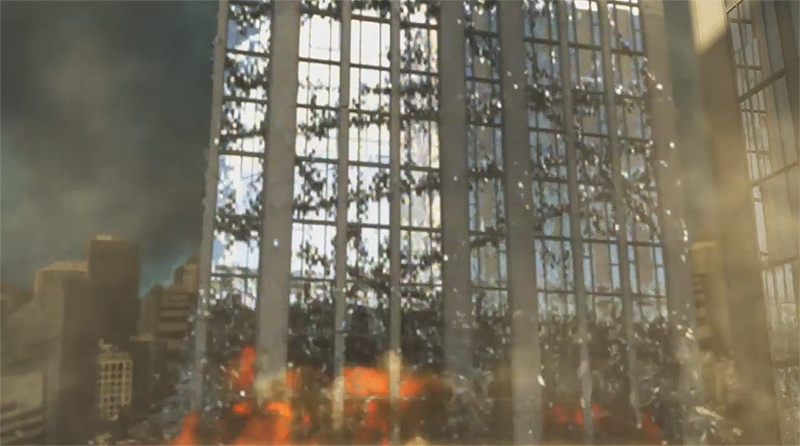
This stage of the project was the most time consuming, because of the long rendering times of the buildings and storage space that was often not sufficient due to the large cache file of fluids, I used Mentalray render, illuminating the buildings using a typical “physical sun and sky” and I added glass reflections to the windows using plane projected textures. The explosions of Buildings were lit with an additional directional light.
The smoke of the first building was illuminated using a three-point lighting scheme.
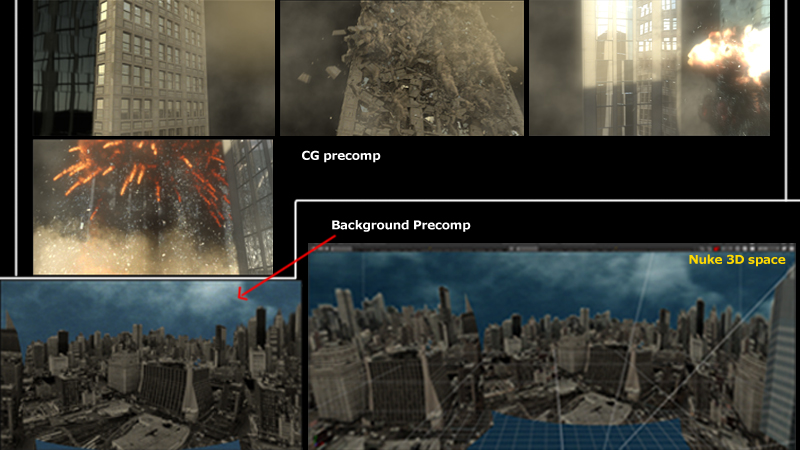
I used Nuke to gather the various render passes and setting up a 3D space scenario around buildings by adding flat projected buildings images to generate a panoramic view of the city. I also corrected several artifacts of smoke rendering by adding more passes but maintaining the original smoke pass as a mask. I tweaked RGB channels to get a good mix of them, I have to create two different precomp “buildings and simulation” and “background city”, I decide to stress more the second explosion by making a color correction on the two final-precomp nodes, modifying the color of the sky, and also adding a “reflection pass” in the two buildings involved in the explosion to stress the brightness of the glass fragments, and finally increasing overall glow strength.
Conclusions
Making of “Mini destruction shot” was a great challenge for me, specially because I had to deal with heavy dynamic scenes using Maya Dynamics and PDI, besides it was a perfect scenario to learn the pros and cons of various choices that can lead to different results in different computation times, this knowledge will be very useful for me in the future when making bigger destruction sets professionally, I hope so. I think Pulldownit is an excellent plugin for collapsing buildings in Maya, it is fast and able to give satisfactory results in a short time allowing a good control of destruction in a few steps, this tool is evolving better and better really. Thanks to everybody for reading this article and watching my shot, remind to add a “Like” if you like it, of course you can ask me if you need more clarification.
Author: Damiano Moltisanti
damiano.moltisanti@gmail.com
http://it.linkedin.com/pub/damiano-moltisanti/56/400/b06
http://vimeo.com/user12851641
