
Andres de Mingo kindly explains us the making of some complex effects using Pulldownit and FumeFX in 3dMax for his appealing destruction shot.
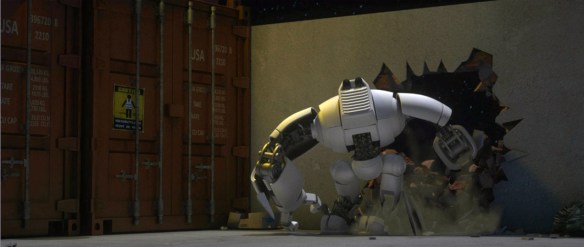
This project was about destroying a brick wall with an animated robot, I had done similar things in the past using Pulldownit and not difficult but this time I needed to create a thin long crack in the stucco before making the wall to collapse and in addition this crack should follow the trajectory of an animated laser beam coming from the hand of the robot, that was the main challenge.
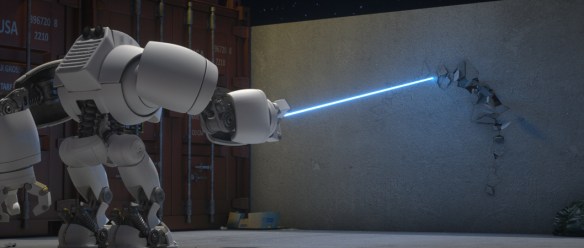
Making the laser beam crack
The laser is a simple thin cylinder in 3ds Max with the height value animated to make it grow towards the wall, besides the cylinder has a Octane material with emission per blue color, in this way it can illuminate the scene and finally to make it shine I added glare and bloom to the cylinder as a post process with Octane render itself.
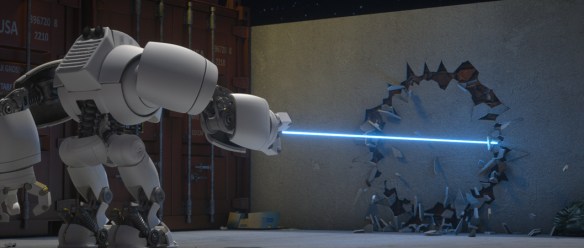
To fracture the wall in the shape of a circle I created a circle spline in 3ds Max and put it inside the stucco, then I used the path-based shatter feature of Pulldownit to create the fragments, with around 200 shards, but I wanted the center part of the wall to break later so I added a second local shatter pattern in the middle of about 70 shards.
For making the crack following the trajectory of the light beam, I used a PDI cracker object attached to the circle path, then adding some keys to make sure the cracker had the same speed of the laser and by playing the simulation I got this appealing effect done in seconds.
Only problem was the center part of the stucco was falling to the ground after it became isolated, to solve it I attached the stucco wall to the bricks behind by selecting the option “Attach Nearest” of PDI Fracture Bodies.
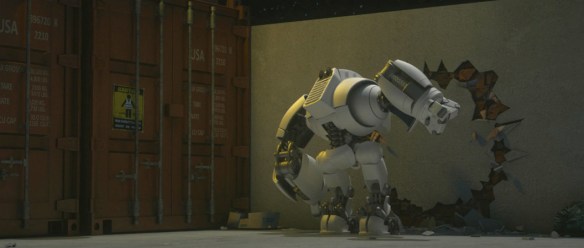
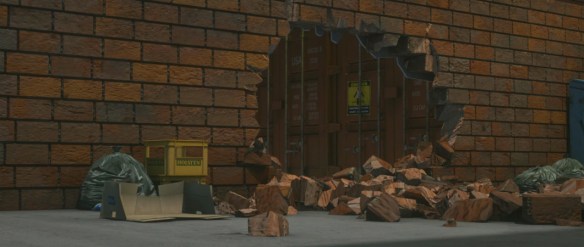
Hitting the wall
The brick wall is made of small cubes attached together as a single object, I discovered this is important to get it broken in the shape of bricks in dynamics, otherwise the wall breaks as a continuous surface. I used a similar setup than the stucco, this time I created two concentric circle splines in both sides of the wall of same size, and shattered the wall in around 1200 shards with path-based pattern, then adding a local shatter pattern of around 600 shards in the middle, in this way PDI created small fragments in the contour of the circles perfect to crack them. Also to get the bricks as separated objects after shattering the wall I had to check the PDI shatter option “detect mesh-groups”.
After getting the fragments created I made a fracture body for the whole thing including the stucco part and set it as static in PDI fractures options, also setting Clusterize to 0 to force the wall breaking only along the circle shapes.
I didn’t use the robot itself for this part of the shot, in its place I created a flat cylinder of the same size of the circle and animate it to hit the wall, so it pushed only the fragments in the middle and hiding this object from rendering made the trick.
I rendered everything with Octane, because it is very fast and easy to use, maybe you have more features with other renderers but they takes much longer to get the final images ready.
Adding dust
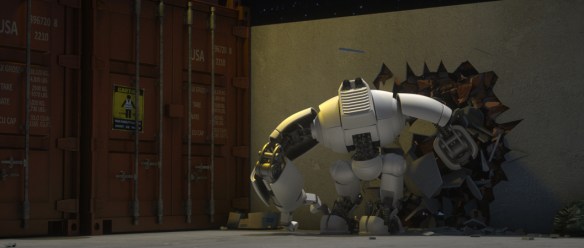
After the PDi simulation was baked I started adding dust with Fume FX, I generated a slight wake of dust following the laser beam by simply emitting smoke from the same cracker object I’ve used before, as this object was already attached to the circle path that was easy.
For adding smoke to the wall when collapsing, I used Particle Flow in 3ds max to attach particles to the stucco fragments but only along the borders, I set around 1500 particles for this, then I set those particles as source in Fume.
Dust is heavier than the air so it must fall eventually to the ground, I played with gravity and buoyancy values until getting the desired look for smoke.
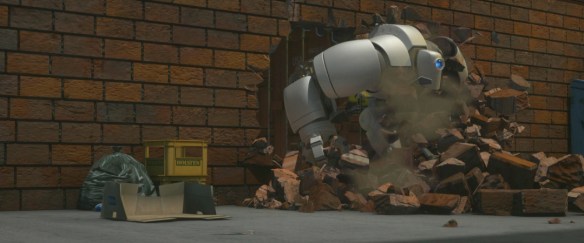
For rendering dust, I used Arnold because FumeFx doesn’t support Octane, however at first I wasnt able to render fume with Arnold neither, finally I had to convert the smoke to openVDB format and use an aiVolume with aiStandardVolume shaders with it, after that everything was pretty automatic except I had to set some parts of the robot that were in front of the smoke as matte shadow objects to render it correctly.
Dust was rendered in a separate pass and composed later in Fusion in this way it gives you a second chance to modify color and brightness to improve the look of the smoke.
Conclusions
It was a nice experience working with Pulldownit plugin, in this shot there were different stages for destruction, first the stucco crack, then the hole in the middle and finally the robot passing through the wall, maybe the most surprising to me was PDI can make all of this effects using the same set in one run, without having to resort to more complex setup like preparing and hiding partially destroyed models and replace them at some moment. PDi was pretty reactive allowing me to get the results in seconds, modify parameters and compute again, that was great.
Adding dust to fragments with pFlow and Fume FX was also quite easy and fast computing.
Thank you Andres for sharing your experience in our blog!
