Akropolis by Christoph Saalfeld

Christoph Saalfeld have achieved a very polished clip of an ancient akropolis destruction using Pulldownit plugin in 3DMax among other tools, here an extensive interview in which the author explains technical details about how the clip was done, thanks for sharing Christoph.

http://vimeo.com/29032719

How did you arrive to the idea of this scene?

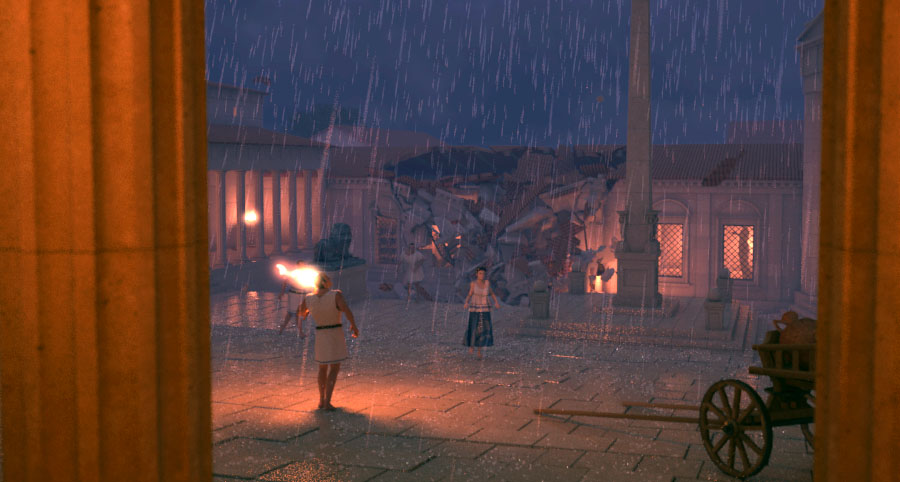
The idea of Acropolis was originally developed out of my initial tests with PullDownIt. I had just heard of it and found out that a demo version was available. So I installed Pdi on my system and of course wanted to blast something right away. Somehow, I had the idea to use a stone pillar as a test object – even a lot of physics tests were made with columns. After I had blown away my column with a ball a couple of times, I placed a second and third pillar in the scene and a few simulations later I had very good results with hundreds of fragments. Somehow I was that much impressed by this test that I have constructed a situation around it. Columns can be found in temples, and as trigger for the destruction I liked the idea of a lightning strike. Furthermore, I always wanted to try to a night situation with rain. In order to be close to the action, I chose the perspective of a handheld camera.

Akropolis_F122_filter

Which tools have you used for making the clip?

Acropolis is one of my spare time projects in which I try to optimize my workflow and expand my knowledge. The whole scene was created in 3ds Max (2010) which is the main tool for me and with which I am most familiar. The scene includes a lot of problems and therefore I also used various tools and plugins to solve these. For example, the character animations were made with Biped that is either driven by hand animations or motion capturing. For the clothing simulations, the Max internal Cloth modifier is used and effects like the rain and the lightning were made in ParticleFlow. For rendering I use V-Ray – it’s a great renderer for global illumination and 3D motion blur, furthermore I can work continuously in a linear workflow and decompose the scene in different render passes due to the V-Ray matte features. With FumeFX I created effects like fire and dust which were calculated with V-Ray in a separate render pass. I also took advantage of PullDownIt for the rigid body dynamics. Especially thanks to FBodys, where objects remain still until an impact occurs, it was easy to create the destructions. At the same time, the possibility to group objects and break them when a certain force exceeds is almost essential for a realistic-looking rigid body simulation.

Akropolis_PDI-01_Clay

Which effects was Pulldownit used for?

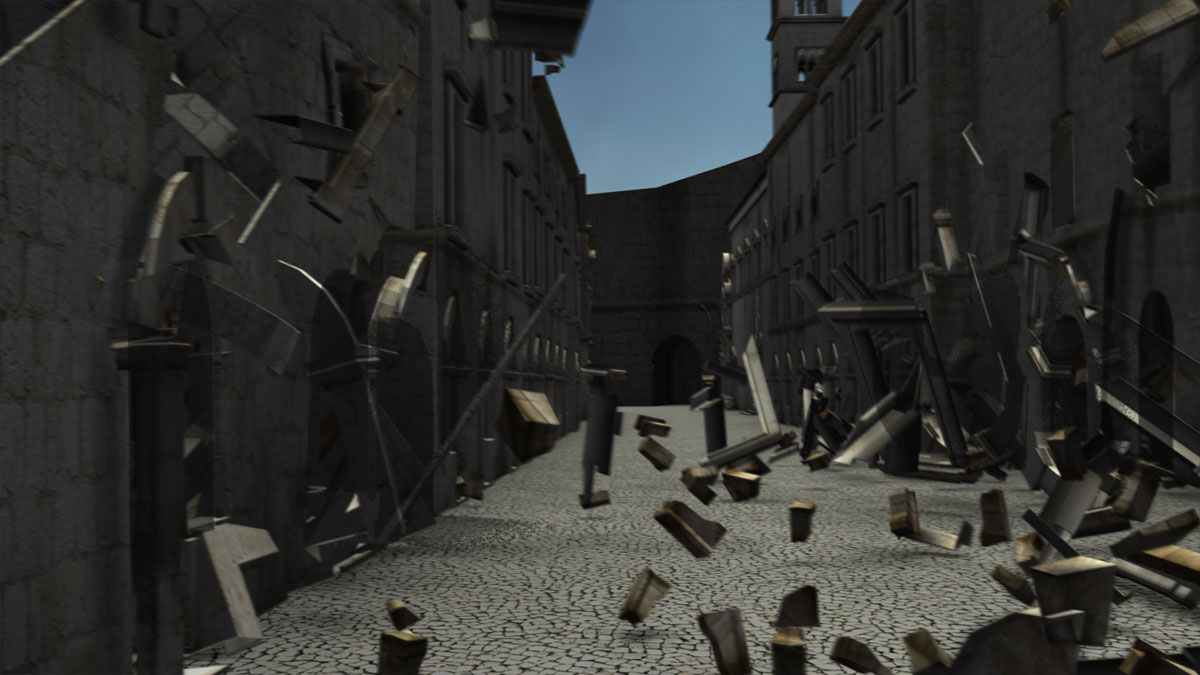
The clip includes two major Pdi simulations. After the first flash, the camera turns and we see how the building in the background partly collapses. The second lightning hits one of the pillars at the entrance to the Acropolis and throws large pieces against the pillar behind it so that this one is breaking also. After missing the support of the columns, quite a bit of the roof structure drops down and breaks the pillars into even smaller pieces.

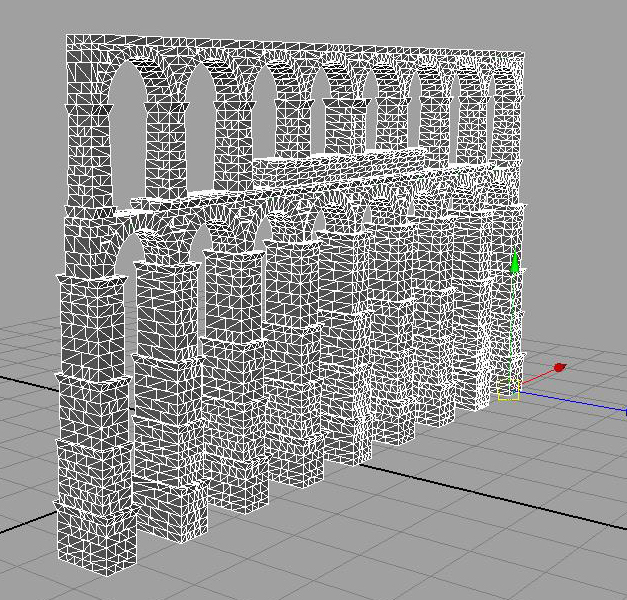
After the modelling and texturing of the set is completed, I copy the objects needed for the simulation into a new file and then work there on the facturing and physics simulation. I find this very convenient since the Max scene is getting smaller again. Here I created the necessary low-poly collision objects and the fracture parts. Then I optimize the settings of PullDownIt specific to this situation and the selected camera angle. After all the basic properties like the “bounding volume”, “Passive or Cached” and the fracture bodys are declared, Pdi already created a good animation with the default values. But this can still be improved with further fine tuning. So I put a bigger mass value on very large fragments and increased the friction of the collision objects to suppress the slipping of the stones. However, the most important values are Hardness and Clusterize for the individual FBodys. In order to achieve a nice fragmented blast, I took advantage of Hardness 40 and Clusterize 70 %. One of the most recent changes was to increase the gravity to match the speed of the falling objects with the dynamic of the shot. For the final simulation, I used 25 sub-samples which was still simulating quickly with more than a thousand objects. After I was satisfied with the results, I was able to merge all the pieces including the baked animations back into my main scene. There I moved the whole thing on the timeline so that it starts at the right moment.

Akropolis_PDI-02_Clay_01

How did you combine dust & debris?

It’s actually relatively easy to produce a matching dust to a finished simulation. I have divided the dust into two fluid simulations which are rendered in one pass. The first FumeFX container creates some thin dust while the debris is falling down. To do this, the fragments are used as emitter in a position object operator in ParticleFlow. The lock on emitter function makes sure that these particles move with the objects. With a spawn by travel distance test, new particles are produced when the pieces are moving. This event can be used in FumeFX with a particle emitter as a starting point for a smoke simulation. The dust cloud that is produced when the debris hit the ground is working quite similar, expect that a collision test was used instead of a Spawn by travel. The invisible collision plane should be located slightly above the actual floor, so that the particles locked on the fragments can penetrate it. I have used a second container for this ground dust, so I can change the properties of the dust and make it much thicker and slower. When I make a render pass for these dust effects I leave all objects as matte objects in the scene. With a separated pass the dust can then be edited very well in the compositing.

Akropolis_PDI-02_Breakdown

The shot looks like camera on hand, how did you animate the camera?

The camera work is – as I call it – a character-driven camera. For this, a simple CAT rig (the base human) is running through my set. I don’t put much effort in the character animation, I only use two of the Motion presets delivered with CAT (GameCharRun and GameCharWalk). I am switching between these presets according to the speed I need. In the CATMotion layer a path constraint helper is picked that gives the Char a spot to follow and with the ground object picked, CAT is generating the footprints automatically. Even if I had to rebuild my ground as one object again, the rest of the character animation is working almost automatically or by simple animation of the path node. The camera is linked to the head of this rig so you got that swing that occurs when running. The camera target is a little more difficult to control. I’m using three point helpers for various effects, another point helper is position constraint between these three and transmits its position to the target camera. The first point helper, located at some distance (directly in the viewing direction of the character), is linked to the head of the Char. The second point is in a free standing position and can be animated by hand in order to manually control the view. The last point is linked to the second one and includes a noise controller which produces camera shakes. In the Position Constraint of the last helper all the weightings can be animated, so you can choose which point affects the target and to what extent.

Akropolis_PDI-01_Breakdown

Tell us your feelings about Pulldownit at this moment, even wishes about  future development.

PullDownIt is a great plugin that can create good rigid body simulations, especially in a very short time. I am fascinated by the accuracy of the collisions and the stability with a lot of objects. The progress to set up a simulation is simple and clear, the values are almost explained by itself. For me, the best features are the possibilities of FracturBodys and StressMaps, but also the built-in shatter system is pretty good. PullDownIt is definitely an alternative to Reactor and PhysX. For further developments, I can imagine another shatter style that creates very irregular shapes, for example.

Tell us a little about yourself, your background, future projects.

Hi, I’m Christoph Saalfeld, but actually everybody calls me “Sali”. I’m 27 years old and I have been working with 3ds Max for over 7 years now. I’ve studied Multimedia | Virtual Reality-Design at the University of Art and Design in Halle (Germany). For the last 3 years I have been working as 3D-Artist in the media department of a large construction company. Here I am mainly working on 3D animations for museums and architectural visualizations. But my personal passion belongs to visual effects and character animation, and therefore I work in my spare time on small video clips with a little more action. At the moment I am building a shot called “Randy’s”, where some super heroes will create some chaos. Two larger PullDownIt simulations will also be included here. In the longer term, I am planning an animated short film about one of my favourite fights from Dragon Ball Z. Of course, I have a small blog (www.intervirtual.de), where I’m documenting my work. I would be pleased if you find the time to stop by.


Wineglass breaking by Luis Tejeda

This was just a fast test of a wine glass breaking shot, after traying PDI plugin with some basic scenes sucessfully I wanted to test it in a more dificult  one that other tools have failed to achieve with good results.
The shot is done in 3d MAX 2012,  I created the wine glass lathing 360 degrees a spline line, after converting it to poly I added the glass shader.
Then I shattered  the wine glass in 128 fragments using “radial style”,  which gets a very convicing cracking pattern for a bullet impact. I selected  the option “Hide original object ” to use the original solid model later in render.
Setting dynamics properties for the ground and the ball was very easy, I set both of them to “auto”, pdi auto detect the bullet is animated and “passive” was autocheck, I set also the ground as a passive object.

sequence

Then I created a fracture body with all fragments, setting hardness 40 and clusterize 20%, I made several tests until getting the more convicing result, this wasnt difficult as PDi computes very fast.  I used “substep” 25 to compute dynamics , in this way I got better quality specially becouse the bullet was in very fast motion and needed more substeps.
Finally I made the render with V-ray, I have to render also the original wine glass before bullet impact and compose both shots later in postproduction,  this is becouse otherwise the fragments are visible from the beginning.

Rewind: Bach in the days teaser by TENAS

Clememt explains how he broke a Cg piano using Pulldownit for his “Bach in the days” teaser

The Rewind teaser was done with MAYA, pulldownit plugin and After effects.

So first i shattered my piano in 500 pieces and i make it explode with a cylinder which collide the piano from the back to the front….the render was done with Mental ray and the scene was shooted at 300 fps.

The footage of Rewind was static so there was no tracking to did. So i started the compositing in after effects (i choosed to render with multi pass for more flexibility) with color correction, DOF… and the first impression was : the footage of rewind seems stick above the background, he wasn’t integrated well. I decided to render some particles in alpha…without background and integrate the pass above rewind.

I was really happy to work with Pulldownit because all is done quick…when you shatter an object it’s done in few seconds, also for the animation, when you bake it, you can rewind, forward in real time. The physics properties are great, in my case the particles collide themself and they give a realistic sensation…. It was a real support on this project and to be honest if i hadn’t found it, it would influenced the artistic direction…

TENAS Website
http://www.tenas-graphism.fr/

Open MAC confererence by Ian Zeigler

Brief interview with IanZeigler about the making of his stunning Open MAC shots using Pulldownit Macos version.

How did you arrive to the idea of these shots?

We were given the task of creating a generic open for the MAC conference (college football and basketball) to air on our local sports network (sportstime ohio).  We knew we wanted to show all the college logos in some type of 3D environment.  With only about 2-3 weeks to go from concept to final product with a staff of 3 people.  I wanted to make some banners and maybe a generic stadium with some logos crashing around.  Looking at lots of different references i liked the “warhammer” look for school battling it out.  From there i started quick sketches.   Due to time constraints any architectural elements were taken out of the equation.  Once i had a general idea i started building pieces in 3D there is no time to waste.

assists_intestital

Which tools have you used for making this shot?

pen, paper, Maya 2011, PDI plug-in, After Effects & Photoshop.

do you feel software usually help you to develop your ideas or mostly do >> you feel computers limits your creativity too often? 

Occasionally through the process of working i stumble across a “happy accident” and something cool is born, but most of the time i feel the computer is limiting and i’m wrestling to achieve the look i want.

which effects was Pulldownit used for?

Mostly just the logos breaking through the ground planes.

macViewport

moc_s6_17

How did you drive the interaction between animated objects with simulated ones?

I set up one passive ground plane that everything sits on and 2 subdivided cubes for destructable ground to vary the soil layer thicknesses.  I proceeded to pre shatter the 2 ground cubes in areas i knew the logos would smash through using the “shatterit” feature of PDI once everything was pre shattered i used PDI fracture basic (which is super cool) to put everything into a group type thing ready to be destroyed.  I did build stand in objects “collision shapes” that matched the modeled logos so i could animate those to break the ground planes.  Then i just tweaked some solver setting and adjusted gravity and started baking simulations out at 80-120 fps depending on the shots.

how did you combine dust & debris?

Once i had all my geometry baked out i had stuff to emit particle instanced debris from and used Maya fluids to create thick dust.

stealsViewport

Tell us your feelings about Pulldownit at this moment, even whishes about  future development.

I find it overall nice just if the shatter tool could shatter crooked lines on geometry not just straight ones would be great.

I was running into problems trying to motion blur the baked geometry.  because the key frames wouldn’t go past 360….the animation graph looked like a saw tooth.  so when i did add motion blur the debris looked like fish flopping around…

maybe add GPU acceleration?

Tell us a little about yourself, your background, future projects..

I interned at industrial design firms in high school looking to start a career as a product designer.   I went to college at the Cleveland institute of art because they have an excellent ID program.  Then of course once in school i started doing more creative stuff, drawing, animating, installations, and decided to go down the 3D generalist route because i knew i could apply 3D to lots of different areas.  architecture, product visualization, creative, etc.  After college i got a job at NBC and Sportstime Ohio in Cleveland doing broadcast graphics and mostly show opens and packages and news sponsors.   And thats where i am now.  Still learning and always trying to improve my skills.

macFinal2


History of Dubronick in 3D Stereo


Recircle have used Pulldownit free version in this appealing documentary about the ancient history of Dubrovnik, known as the ‘pearl of Adriatic’ in Croatia. Denis Valentic at charge of this production tell us about his experience with Pulldownit:
Dubrovnik_1


Regarding the History of Dubrovnik Project, the client had contacted us few
months prior to actual production start so we had a little time for
research and preparation. Production itself, from the start to the
completion lasted for exactly two moths. The final product was a 13 minutes
stereoscopic 2k short film about chosen major Dubrovnik’s historical
moments.
Earthquake sequence was targeted to last around 30-something seconds and I
had a week to produce it. First I started with setting the camera movement
and, when I was satisfied, I proceeded with breaking buildings (only ones)
visible to camera. For this I used Fracture Voronoi script – being free
and stable was a big plus.


Dubrovnik_wire_6

Stones_1


I ended up having twenty-one building and twenty-seven thousand pieces.
Next, I had to knock it down somehow. I started with max reactor and :: K
a b o o M :: script, but this wasn’t working for me. Then somebody
on cgsociety mentioned PullDownIt. After initial test I was won over.
Don’t know where to start; speed, stability, ease of use and so on and so
forth. I know it sounds like an advert but really it’s not. If you’re alone
in studio going crazy at 3 AM and nothing is working and then everything is
breaking apart from the first try, pure pleasure! So, from there on –
everything was easy; I opened a new scene with one house in it, broke it,
collapsed it with Pdi!, adjusted keyframes and repeated this for
twenty-something times. Finally everything ended up/fit in one scene. Nice
and easy

Dubrovnik_4

Author web site:

http://www.recircle.net/

Acueducto of Segovia Cg destruction scene disected

This project was about making an ancient building collapse, in the way it looks as much real as possible, we decide to demolish digitally the Acueducto of Segovia, becouse it was a challenge and becouse the real building was nearby Madrid( Spain) where we are located. So first step was going there and take some shots of the real building, from different pespectives, by the way Segovia is a very nice medieval site to visit.

acueducto_segovia_P_r06_00000

Then we built a digital version of the central part of the acueducto, this was done in Maya, becouse Pedro Ivan made every brick of the Acueducto as a single object and textured it, there are more than 4000 bricks in this model, and Maya happens to be easier than Max to model the whole thing. In addition the central part of the picture was removed using a 2D paint tool, and Pedro managed to fill the “hole”, with background buildings which should be behind the Acueducto but obviusly doenst appears in the picture. The trick was taken some shots of the buildings behind it, and compose later both takes.

acueducto_wireframe

I took the 3D model, by my side and start to make demolition test with Pulldownit, we havent tested anything so huge till then, it tooks several weeks to fix and improve the solver for being able to simulate such things, the most dificult issue for computing dynamics was the fact the Acueducto is made of arcs, this structure stand very well in the real world but it is extremely dificult to mimic its behaviour somehow in the computer.

We finally managed to made the Acueducto demolition in 3D, the final simulation tooks about 25 min to be done with Pulldownit in Max, we had to export the model to Max becouse the render using V-ray, was definetively easier to be done. but it still left to integrate the 3D model with the real picture, this was done using a composition tool, we took care specially of the render light which had to match exactly the light in the 2D picture.

ShotLargeCentre

For the final shot Pedro added also some particles in postproduction for dust and smoke, by adding particles directly in 3D you ussually get a better integration but at cost of terrible render times, for this kind of shot where the camera is fixed, without rounds around the model emmiting particles, 2D particles ussually do a good job, so it did the trick.

Shot20

Shot30

Author: Ivan fde Frias