Televisor studio and ColorTV created this thrilling intro for Deadfall Adventures, game by Nordic Games, official launch. They confirmed Pulldownit plugin was used in the jungle plane scene:
One of the most spectacular scenes is the plane flying towards the camera. The number of elements we had to generate for this scene was overwhelming. You can see the amount of work that had to be put into this scene on the “making of” material. We used the Pulldownit plug-in http://www.pulldownit.com to crash the trees, which saved us a lot of time and workload.
No worries, this is just a great shot by Johan Halleröd using Pulldownit, he kindly explains many details here.
First off – I am not that particularly fond of flying due to an incident when I was young, so analyzing myself this might very well have been a plain therapy-thing. But the major reason for spending three weeks on a non-profit 3D project with this magic plug-in I had never before heard of, is actually because of a friend of mine. I had made an animation with another plane passing over the same bay. I simply let this plane blow up in a burst of smoke and flames…he was not the least impressed claiming he was missing debris.
The Plane Model
The plane model I decided to use for this project is a Hercules US C 130. I didn`t model it myself but I chose it because of it`s monstrous appearance. I wanted the impact to feel heavy and serious thus it`s more relevant to use a Hercules than a Cessna. It`s also prop-driven which adds interesting fractions on impact.
And for the environment: First I filmed and 3D-tracked a clean-plate from my apartment window, using a DSLR cam with high shutter speed to reduce motion blur thereby getting a better tracking result. To complete the whole scene, I had to split it up in several parts. (naturally) Breaking the Plane
I realised that my model had way too many polygons for a smooth workflow, so I carefully reduced the amount using Max`s ProOpimizer without deforming the model too heavily. Luckily the plane is pretty far from the camera and I was about to blow it up anyway so…
The mesh was then fragmented part by part using the `Uniform Shatter` and `Wood Splinters` in Shatter tool of Pulldownit, (wings, body, interior) to make the impact look right. It`s unbelievably tempting to use Pdi for completely atomizing the poor Hercules-thing as it plunges to the ground, but I got a grip on myself letting the cockpit and the wings maintain close to intact and preserving the interior cargo so there would be something left to blow up after crashing.
The falldown-process was done in a perhaps unorthodox way by placing the plane out of frame and then using the `Initial velocity` x-parameter in Pdi to force the plane horizontally, the gravity to make it fall down on the right spot and the `Initial Spin`-parameters for banking and pitching slightly. For fine-tuning the fragments upon impact and make them behave as I wanted, I adjusted the `Hardness` and `Clusterize` parameters ; notice the props bouncing off on the ice, pretty neat I think. I also found the `Linear damping` and `Friction` parameters of PDi very handy to make the plane drop and stop spot on.
Exploding Fragments
Now, to make the plane explode with the right chunks taking off in the right directions and with the right dimensions (more and smaller pieces), I had to re-shatter parts of the model. I saved the 3DMax-project as “Part 2” and at the plane`s initial position thoroughly I re-shattered the bits and pieces I wanted to trigger the explosion, i.e cockpit, wings, fuselage and a few more. Then I placed a spherical PBomb , making sure were affected by force fields in Pdi, slightly to the left of the fuselage midpoint, trying to make the plane`s front parts take off towards the habitation, the houses in the back, and after some tweaking they did.
This “part 2”-clip was carefully edited on to the impact-part in After Effects. For the final wings wing-thud, I simply manually animated a separate tail wing not affected by the force field. I had even planned for it when filming the clean-plate by chicken-ducking the camera as the wing comes towards me.
Adding Dust & Smoke
The final compositing was made in After Effects, adding stock shots of rock debris, dust waves, sparks, flames, explosions and also some basic 3d smoke from Particular. As usual, adding real elements ie. stock footage, to a CGI always adds realism and I used a total of 15 different shots but for some reason the humongous apocalypse-bomb at the end…is CGI. Don`t ask me why. As a matter of fact, I am not too proud of the first frames of the explosion when plane parts exit the flame, I just couldn`t get it right…or maybe I was hungry and didn`t care. But if you take a look at the first impact of the crash when the rear cracks open, there are plenty of things going on in terms of stock footage which adds realism; steam pours out from the cargo and bundles of 100 dollar bills ( I guess), falls out of the wreck, pretty real to me.
Mixing Cg and real footage
To make CGI and live footage work convincing together, they need to get married. First and foremost you want a rock solid 3D-track, this became a problem for me since I was using a shaky hand camera. I used “Boujou” that was installed on the computer I worked on. Second; as mentioned, real world stock footage. Delicately adding authentic smoke, fire, debris and what not, tends to fade the boundaries between real and binary world. So does final grading.
Conclusions
The conductor of this Hercules-symphony is clearly Pulldownit! I had no experience of using it before, but as soon as I started experimenting and tweaking the settings, I found it very intuitive. The mission itself was pretty basic: You have your model, now make it fall down and break apart. The trick lies in selling the shot without people reflecting on the technique behind it, and that`s what makes Pulldownit so brilliant – it`s easy to master, you can get stunning results with very good dynamics and I have only just scratched the surface.
Andres de Mingo explains how he broke the animated Golem in dynamics and other technical details about this funny shot.
Modeling the environment
The environment of the scene was modeled in 3d Max using polygonals modifiers and adding roughness to the mountains in ZBrush, for not increasing too much the poly count, I applied the changes as a normal map when coming back to 3D Max.
Shading was applied using the Polypaint tool of ZBrush using several HD pictures of stones as a basis. For the little stones here and there I used a particle system in 3d Max to spread them over the ground and instancing them as geometry. The sky is a simple plane with an animated FFD modifier to get the feeling of clouds are moving on the background.
Modeling the Golem
I started modeling the Golem in Max creating a low poly version of the overall shape. I had to convert this solid shape in another one made of different size stones, my first idea was using shatter it tool for doing it, uniform shatter style of PDI worked well however I wanted the fragments on the hands and feet of the golem to look like fingers and this wasn’t possible using Shatter it, besides I liked the Golem to be hollow inside to enhance the feeling of weakness when it breaks, so I figured out a different way. I took the bigger fragments generated by Shatter it on the surface for only one side of the character, making them thinner and flat, modifying its shape when necessary. That was a patience job but I got a good cover of large flat stones.
Mirroring this side of the character I got the whole model covered by stones nicely, I had just to fix a few stones on the middle for not interpenetrating each other. There were still a few little holes over the surface, to fix it I generated some particles over the holes and instanced them as geometry to cover these little areas.
After unwrapping the model I exported it to Zbrush for adding surface detail and texturing it, I used the great Polypaint tool of Zbrush for texturing it.Once again in Max, I built the rigging to can animate the Golem, I did a simple system of bones with IK Handlers, grouping the stones and linking the groups to the nearest bones.
Breaking the Golem in Dynamics
At this point I had a character made of 400 pieces, rigged and animated and I wanted the arms to break when hitting the rock in the middle. First thing I did was reshattering the pieces on the arms in about 5 shards each one to get more fragments when breaking it. I set the rock as a static convex PDi rigid body, the ground as PDi static mesh and selecting all fragments of the character I created a fracture body for it.
When simulating the scene, computation was very slow, checking the scene I discovered my ground was a high tessellate plane made of about 500000 faces! I applied a multires modifier to it cutting down the faces count to just 5000 while topology was preserved pretty well. After Updating the new ground object in PDi the simulation was much faster, however the arm of the character did strange motions when breaking and the whole character started to collapse too soon.
I decided to set up the simulation again with only the right arm of the golem in dynamics and of course the rock, after some testing I discovered that the problem was the arm motion was too fast for computing dynamics correctly, so I simply rescaled the time for making the animation 10 times slower, and this time it worked perfectly so adding the ground to Pdi and computing again I got the right arm breaking nicely.
I followed the same strategy for breaking the other arm and the chest, that is, I deleted all current Pdi bodies, setting the left arm in dynamics and simulating it along with the rock and the ground, doing in the same way for the chest of the golem after that. To take in account the flying fragments could eventually collide with those already on the ground, I set those fragments as kinematic Pdi bodies aswell.
When all the destruction job was done, I simply rescaled the time again to be 10 times faster for coming back to my original timing. But after doing it some fragments were trembling strangely over the ground so I had to cut off its motion by hand deleting its keys after the frame I wanted them to keep still. Finally I wanted the head of the Golem to bounce and roll towards the camera after breaking, for this I removed the parenting of the head and set it as a pdi body of type capsule, it was easy to make it rolling by assigning it a suited initial velocity.
Conclusions
I know breaking an animated character in dynamics is a difficult task with any tool. Pdi behaved well for shattering and dynamics, Im happy with the final result , however the setup of the scene was plenty of issues, like having to perform the simulation in 3 diferent steps. Pulldownit is an excellent plugin I wish it improves in the future to break animated characters more easily.
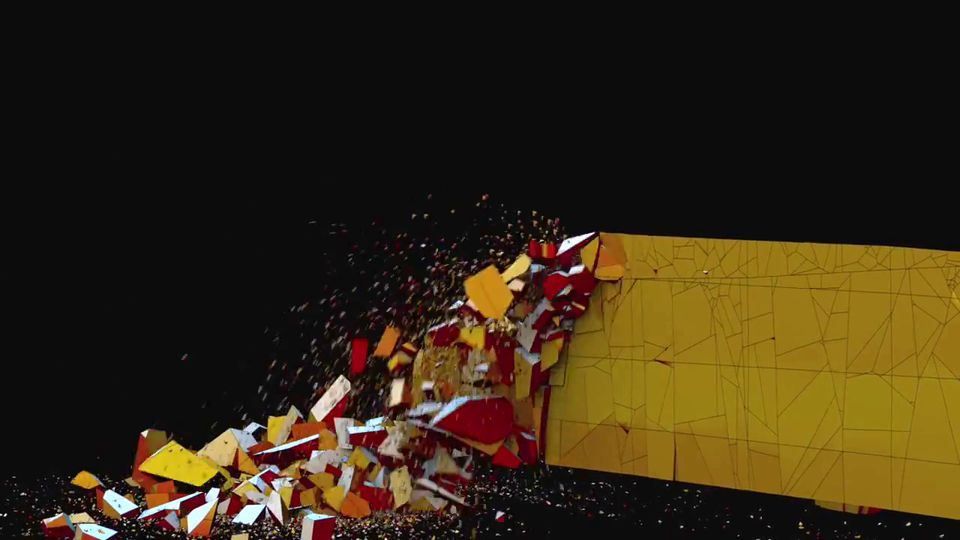
Julien Chiari tell us his experience using Pulldownit and Phoenix plugins in 3dMax for his destruction tests inspired by Minas Tirith. It is a good idea to make some tests before going to something bigger and with Pulldownit you can do your previz destruction fast and easy as Julien explains below.
When seeing “The Return of the King” by the great Peter Jackson, the destruction scenes of Minas Tirith environment impressed me a lot, so a little later I decided to create a destruction scene in the same spirit, and at the same time testing Pulldownit plugin in 3d Max which looked like the perfect tool to do it.
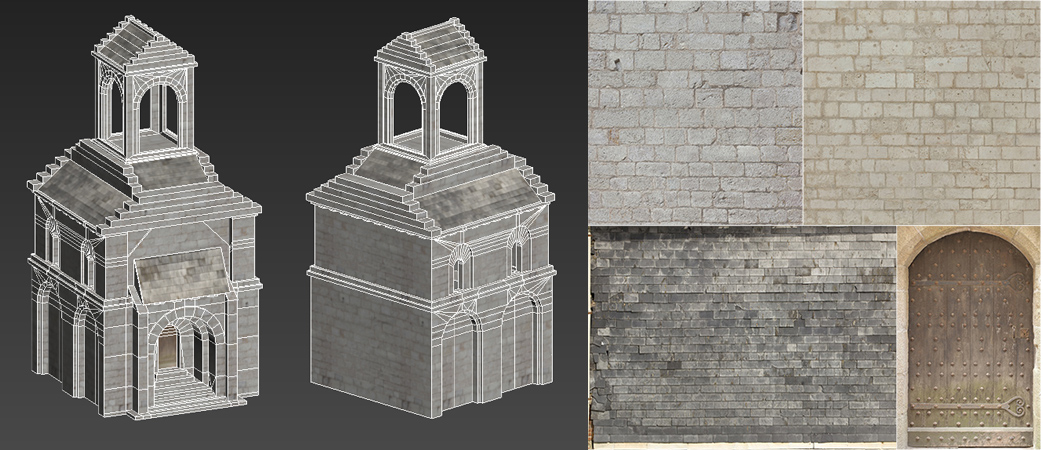
Modelling & Texturing
Using screen captures of the movie as references, for creating the building I started from a box primitive converting it to a polyobject and building the shape step by step using poly modifiers; given that the model was going to break, I was especially careful with topology, not open edges and such, and also keep poly count low for faster computations, at the end the model was about 2500 faces, I created shaders and VRay materials from HD textures found on the site cgtextures.com, great site to find textures by the way.
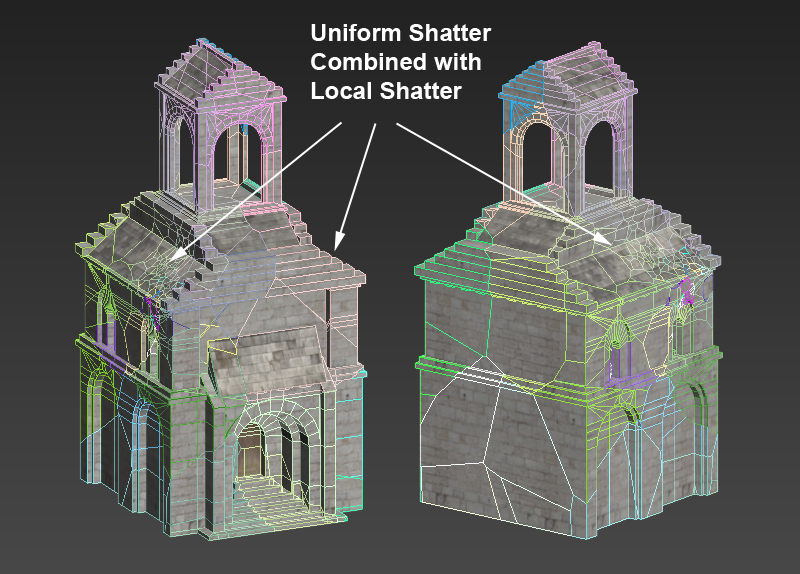
Shattering the geometry
I started applying an uniform shatter to the whole building, PDI did it perfectly at once, even the tower and the complex geometry in the main door were shattered correctly and almost instant, pretty impressing. After that I added more fragments in the area of impact with the impact stone using local shatter, after a few seconds PDi had generated about 560 nice fragments from the original solid model.
Just after that I added PDI Jagginess to the fragments with a resolution of 2 to keep the poly count as low as possible but still increasing the realism of the fragments, this is one of my favorites features of PDI.
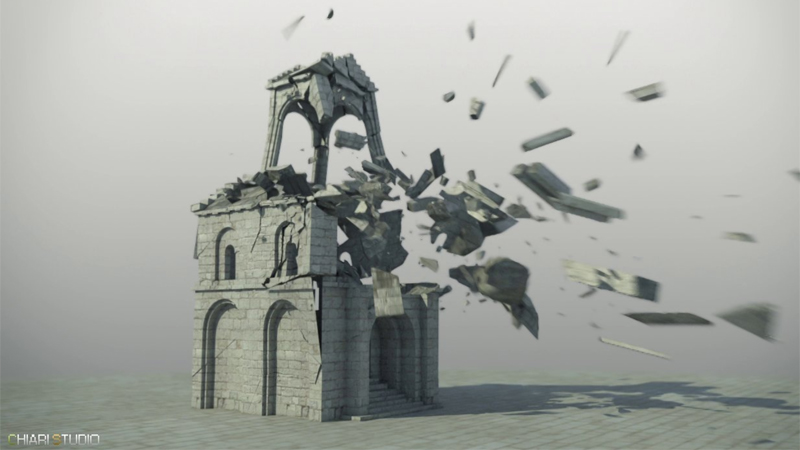
Computing Dynamics
I created a PDI dynamic body for the impact stone, to make It move fast I simply added a large initial velocity and spin in PDi dynamics properties. Besides I created a fracture body for the whole building. I set quality medium for the tests as it was still pretty fast computing, using a core i7 with 16GB RAM, it took about 4 min to compute 250 frames of simulation, this nice speed allowed me to perform several tests with different parameters until achieving the desired look with ease.
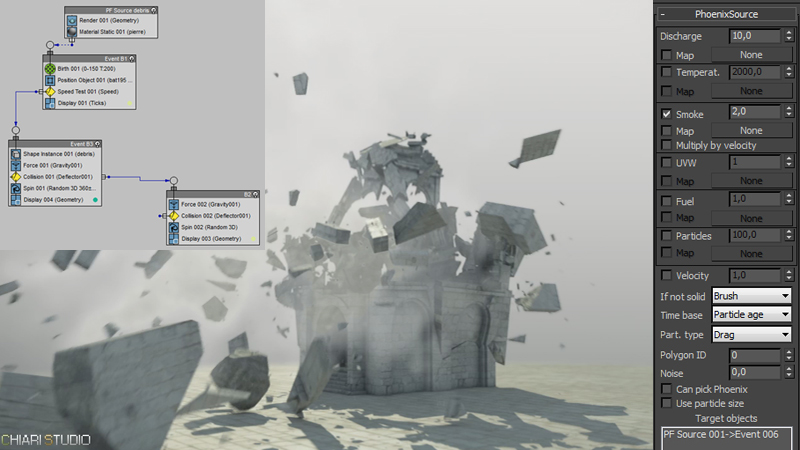
Adding smoke
In order to add smoke to the destruction scene I have used the plugin PhoenixFD. For doing it I used a Pflow chart to emit particles from the fragments only when they reach a certain speed, for getting this the event 6 of the PF source was used as target for a PHXSource node.
Conclusions
In my experience Pulldownit is a powerful and easy to use plugin and very stable. The set of parameters allows getting fine control over the simulation, moreover it is fast computing. I will continue using it in my projects as after the tests, I have been definitively seduced by its stability, speed, simplicity and the quality of dynamics I`ve got.
About the author
Hi everyone my name is Julien Chiari, Im a 3D generalist currently living in south of France. I have got my degree at SupInfoCom Valenciennes, after that I have been working in videogames like Vrally, Roland Garros 98 or Test Drive Unlimited, since year 2000 I work as freelance in different projects. My web sites:
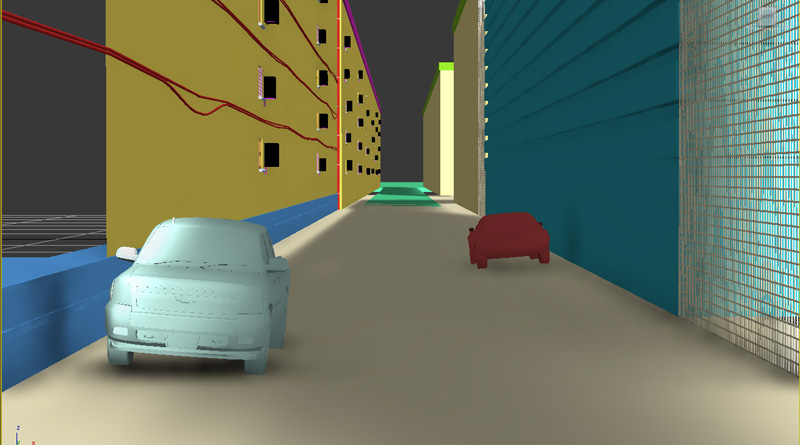
In this article Ivan explains some highlights about the making of this awesome destruction shot using Pulldownit 3 in Max.
Modeling
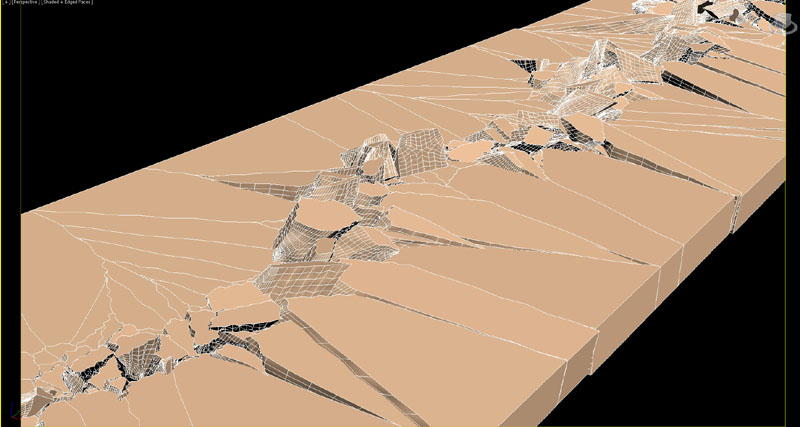
All modeling was done in 3d Max, taking care that models which were going to be fractured were independent and completely closed. The road was sculpted from a polygonal box for generating fragments of the desired thickness.
The buildings have been done from patches, and adding detail with edit poly.
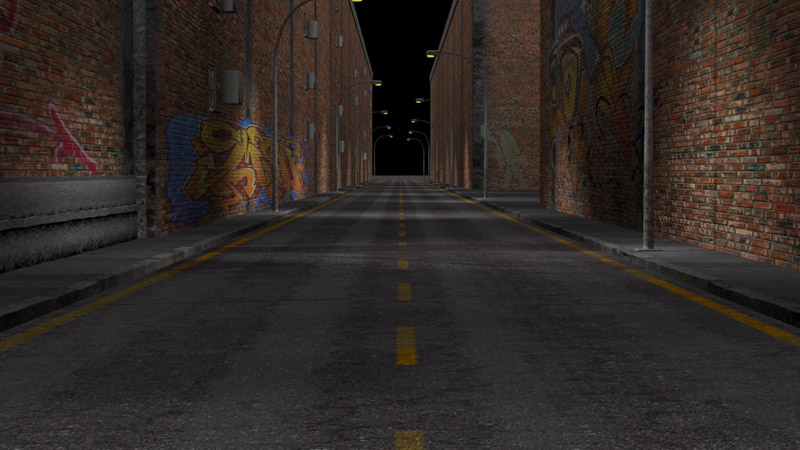
Texturing:
The shaders in this scene are mostly procedural and counts with several maps.
The road has a composite material of 10 levels, the base material is a picture of asphalt and adding other maps for displacement, oil slicks, cracks, holes..and so on to make it as realistic as possible. The border lines are added in a procedural way acquiring the texture and shape of the asphalt.
For the road fragments I have created a mask with 2 shaders, one of asphalt and another of soil just below the road.
The walls of the buildings counts with a base shader of tiled bricks and adding dirt and concrete layers, several graffiti bitmaps are added aswell.
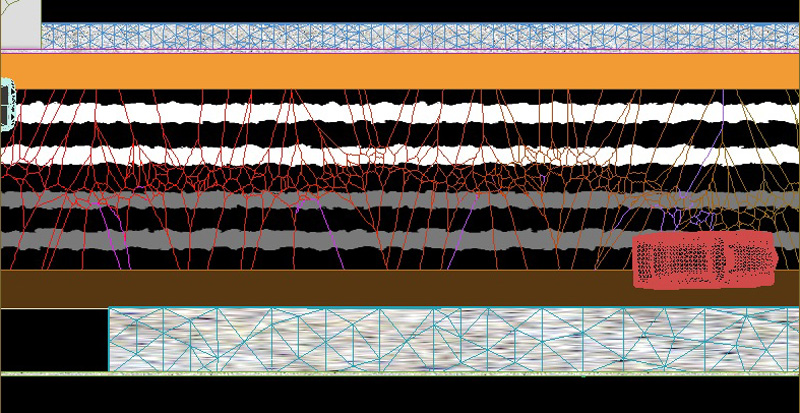
Shattering with Pulldownit
I wanted the crack starting in the middle and my road model was very long, in my first attempt with Shatter it, it was possible to be done, however the fracture body created after that included also the long part of the road which doesn’t break so I decided to split the road first with an slice plane to get this long fragment out of the simulation. So I drew my path over the other part of the road starting from behind it, I did it with a little zigzag for making it more realistic. Then I set path-based shatter and break the model in about 2000 fragments. New Shatterit preview mode was very useful for setting with more ease the extent of the fragments along the path.
Dynamics with Pulldownit
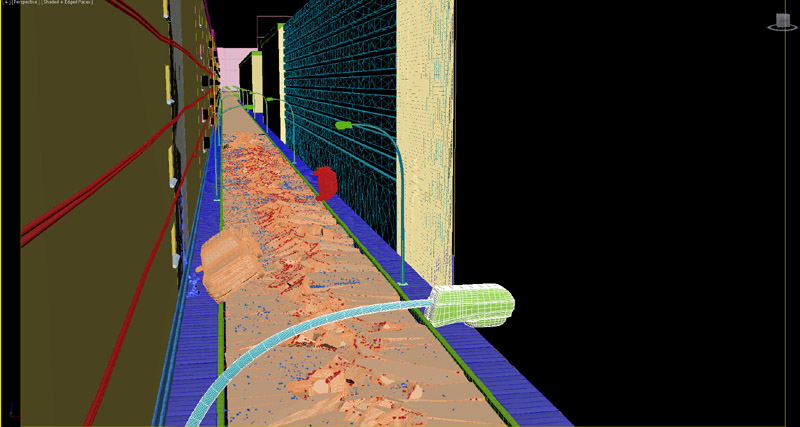
I continued by creating a fracture body for the fragments, and set fracture parameters for cracking surfaces as I had been told, 0% clusterize, static and activation as breaks upon impact and local propagation scheme. After that I created a Pdi Cracker selecting my path as source, when computing the road was breaking but fragments where falling to the void in the middle, I realized that I had to include another large thin box as static object just below the road for preventing this from happening. The new crackers panle was very handy for adjusting the crack effect, I set the impulse direction upwards because it looked nicer to me, and also increasing randomize to the maximum value. The cracking was indeed cool but most of the fragments came to rest without any slope, I wanted them to remain with some slope after cracking, it was easy to achieve adding a wedge object below the road model and setting it as static objet, in this way fragments leaned over it and I had only to hide the wedge in render. After the simulation was done I added more detail to the fragments with the amazing jagginess tool of Pdi and it looked much more realistic.
Adding dust & debris
After the Pdi simulation was done I added more debris using Particle Flow, I created a Pflow source emitting particles from the fragments on the middle of the crack, about 200, making the particles inherit the speed of the fragments at 40% and adding a deflector to make them collide with the road.
In addition I created another Pf source of many tiny particles moving very fast, rendering them with Motion Blur Ive got the feeling of dust being emmited from the crack.
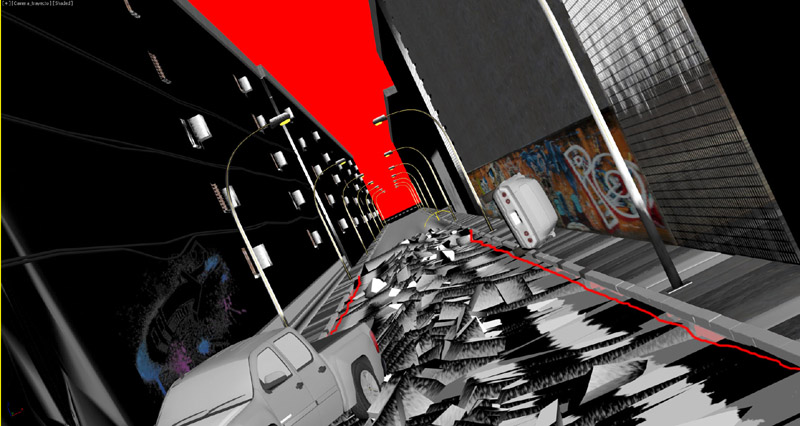
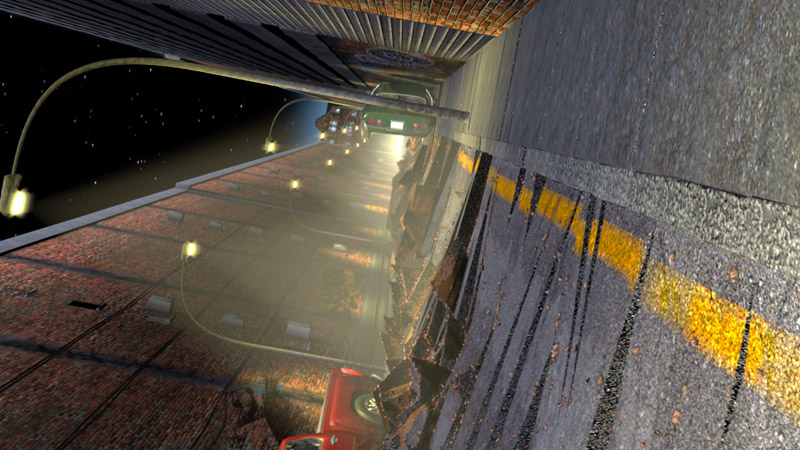
Lighting and Render
The camera trajectory has been animated adding a noise constraint to mimic the natural shake of a camera being hand-held inside a vehicle.
This is a night scene so pretty dark, there is a base ambient light and direct lights coming from the streetlights, a few extra point-lights has been added behind the buildings to enhance the illumination of some areas, all lights in scene counts with volumetric masks.
25 diferent render passes where needed using mental ray
David Roubah, lead FX at Mikros Image explains some details about the use of Pulldownit in “Monolith” clip.
We had a few destruction shots to complete on the commercial. Two of them
in which we needed to create a fracture were entirely done using the
Pulldownit plugin for maya.
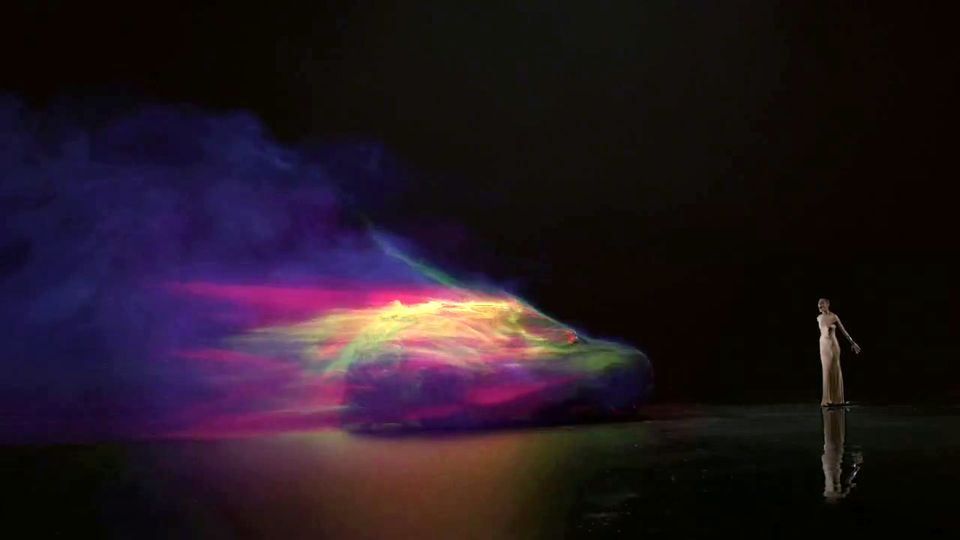
The first one is when a woman is dancing tango with her partner and breaks
the monolith all the way long which makes the first line of the car appear.
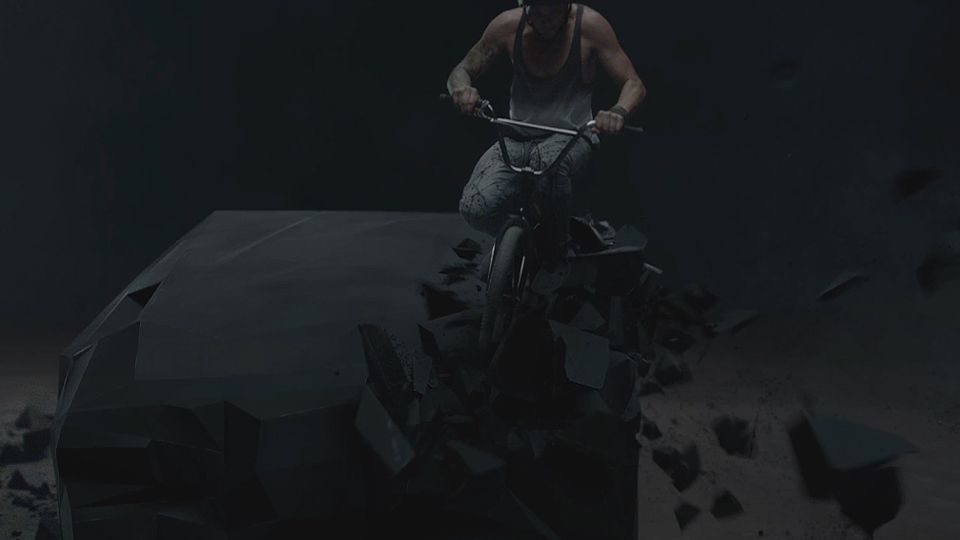
The second one is when the biker falls on the roof and shapes a little bit
more the stone into a car.
These two shots were extremely challenging for a couple of reasons:
They are directly preceeded and followed by shots including live blasts
effects which mean that we had to make our fracture match to those of the
real shots.
Beside this constraint of realism, we also needed to exactly control the
propagation of the destruction in terms of shape and speed as well as the
starting and final shapes of the monolith that is finally giving life to
the car through each step of fracture and has a primary role in the
narration.
These particular demands led us to use pulldownit as well as for example
the need to control size and shape of each fragment, and even remap their
inside faces…
At Mikros image, we have a particular approch and we consider the effect in
his globality : from the modeling to the compositing through rendering. We
decided to make this fractured pieces a base for the particles and fluid
simulation, that have been rendered and mixed together with Arnold renderer.
Every element of the effect have been imagined in terms of interaction: What
is influencing what, in the dynamics, but also in the lighting.
And again, it was a pleasure to have a precise and powerfull tool fully
integrated in maya!
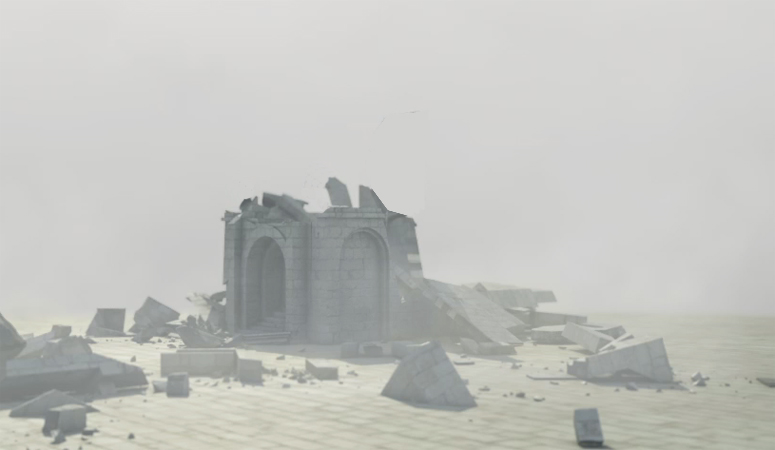
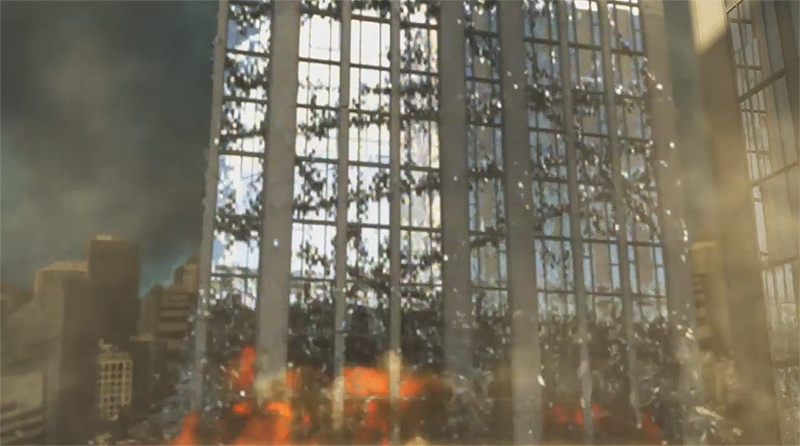
Looking at the latest catastrophe films, particularly “2012”, I was fascinated by destruction effects of extreme realism with the use of real models and dolly cameras, so I embarked on this challenge to explore and experiment with different VFX techniques in Maya while testing Pulldownit plugin in large-scale destruction, considering all stages to the final shot.
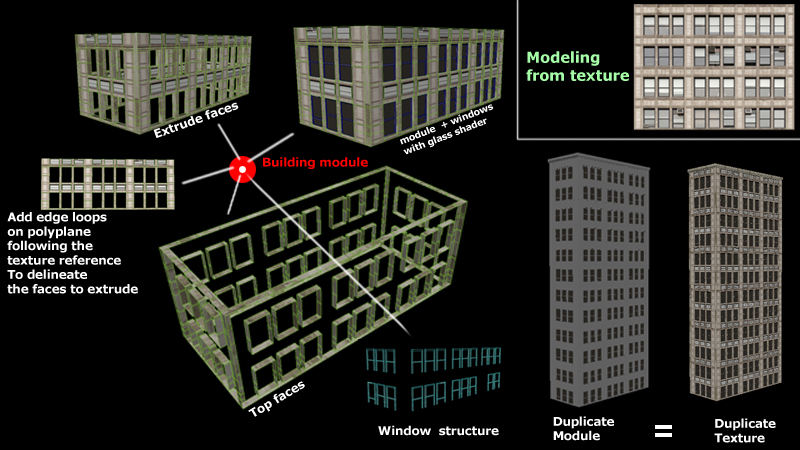
Modeling
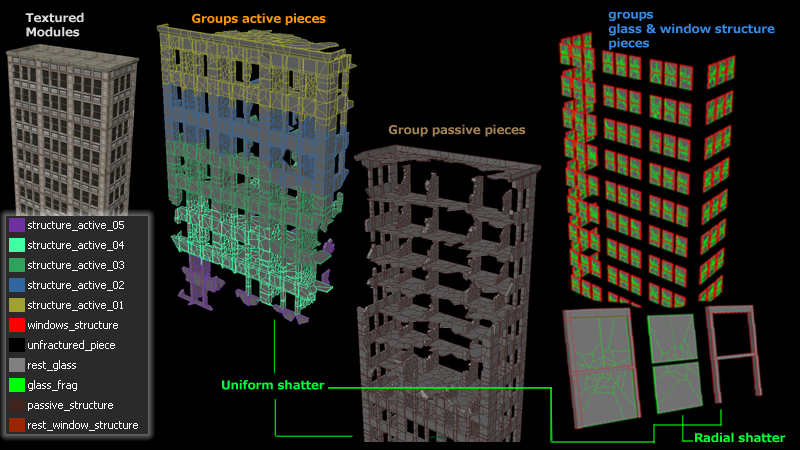
All the buildings were modeled from real images, using high-resolution “CG textures” as reference. I projected each texture in a simple “polyPlane” in Maya and I started to add edge loop tool outlining the shapes of the windows and metal structures, following by extracting them ( “extract tool”) from the rest of the plane in order to manage the extrusion of faces separately, thus obtaining a shape on which to work. Then I gave different thickness to walls, glass and windows frames, assigning a reflective shader to glass, a metallic shader for the windows frames and a stone texture for the walls. Once I got one floor done, it was as easy as duplicate it to decide the number of floors per building.
Shattering with Pulldownit
I applied initially an “uniform shatter” in 3 pieces to the walls and pillars of individual buildings, reshatering each big fragment in around 200 pieces again, checking “PDI cut” material option so as to be able to apply the same “stone texture” given to the original faces to the internal ones. Also I created a “quick selection set” to use this selection of faces in the future and made different groups with the fragments to can handle them independently in the PDI basic fractures panel.
For the windows I used “radial shatter” splitting each glass in 10 pieces and increasing the “Shatterit->noise” option to get a more realistic look. Windows frames were shattered in 5 pieces and grouped to be handled separately.
Dynamics with Pulldownit
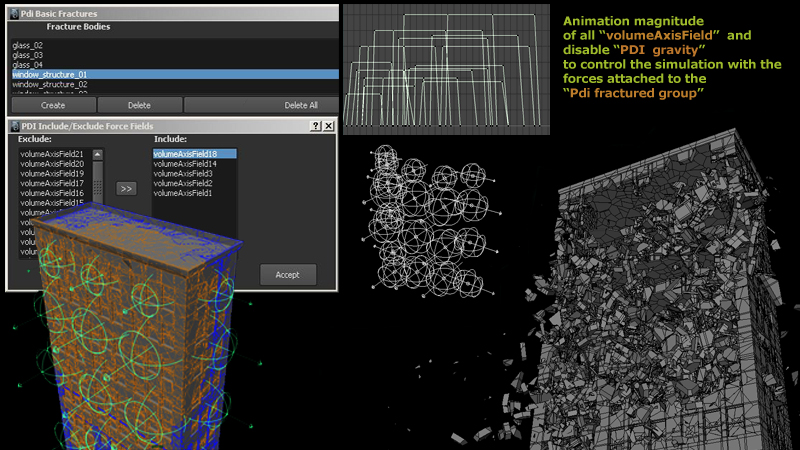
At this point, I had diferent groups of fragments added to “Pdi basic fracture” panel, so the posibilities of making them break in diferent ways are many. After several experiments with a few pieces, I tried to control the activation of the fragments by placing different “volumeAxisFiels” along the walls and linking them to the PDI fracture groups, also disabling gravity in “PDI solver options” for tweaking the Maya fields only. I had to animate the fields’ magnitude to get a more organic look of destruction. After I was happy with the walls fracture I added the glass and windows frames groups to PDI basic fractures, assigning them a mass value much less than the one of the walls, and Pdi computed the whole destruction set in a short time indeed.
Emitting debris in Maya
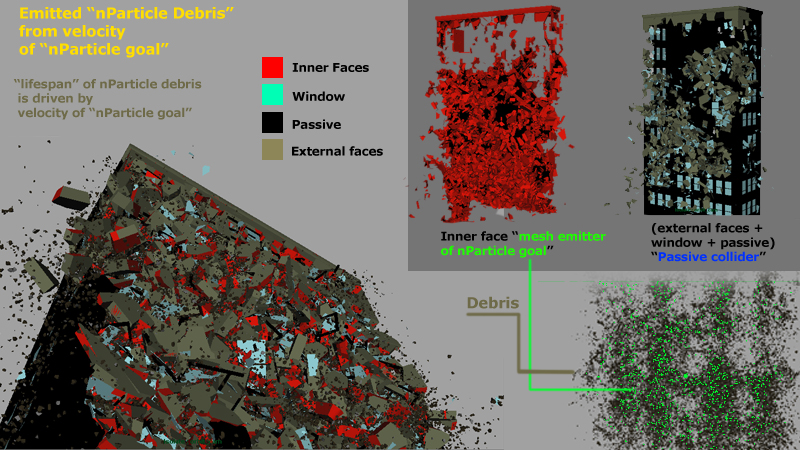
After the simulation with Pulldownit was done I made a Maya cache of all geometry, in order to select only the inner faces I used the “quick selection set” I had created previusly. To generate debris only from the pieces that start to activate, I emitted a first stage of “goal nParticles” from the “inner faces” by adding the property “goal” to constraint nParticles to the geometry and subsequently make the “velocity” of the geometry affecting the “lifespanPP” of the particles via “PPexpression”, the “debris” are then generated by new “nParticles” emmited from the first “goal nParticles” and constrained by the attribute “ratePP” velocity of the goal particle.
For instancing the particles as geometry I used again Pulldownit to break a polySphere in 200 pieces, assigning them to nParticles randomizing the scale and the index via “PPexpression”. Finally I activated collision between “nParticle debris” and the outer faces of the cached geometry.
Maya fluids simulation
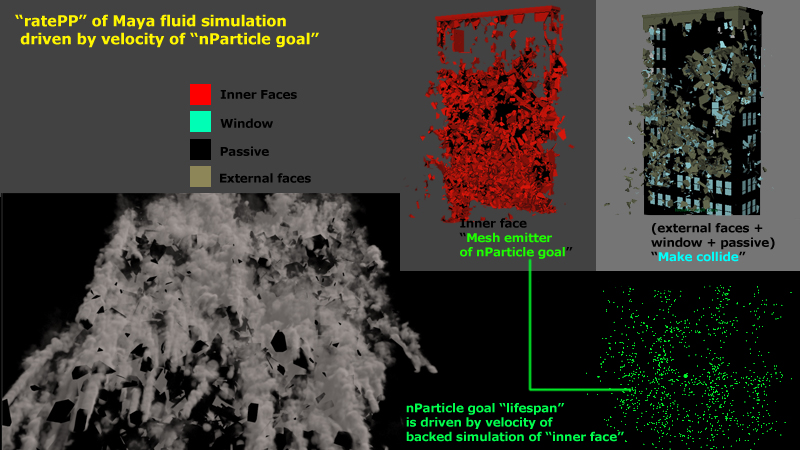
Maya fluids emission was made in a similar way to the debris. First, I created a fluid emitter from the “goal particle” attached to the “inner face” and constrained by “PPexpression” attribute “ratePP” of the fluid emitter to the “lifespanPP” of the particle goal. In order to prevent smoke from passing through the walls I activated collisions between “fluid container” and “external faces” of the cached geometry.
I did a “fluid cache” setting resolution to “500” for the “fluid container.” This method allowed me to save time in the final calculation because I got a large fluid simulation only with one fluid emitter inside the container.
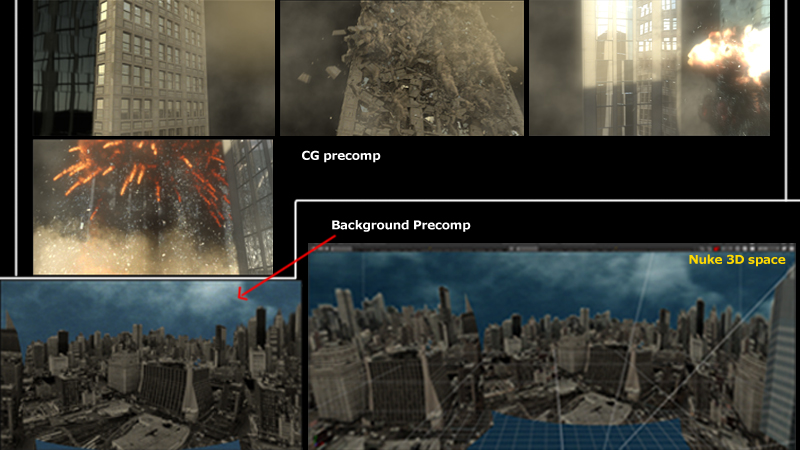
Rendering & Compositing
This stage of the project was the most time consuming, because of the long rendering times of the buildings and storage space that was often not sufficient due to the large cache file of fluids, I used Mentalray render, illuminating the buildings using a typical “physical sun and sky” and I added glass reflections to the windows using plane projected textures. The explosions of Buildings were lit with an additional directional light.
The smoke of the first building was illuminated using a three-point lighting scheme.
I used Nuke to gather the various render passes and setting up a 3D space scenario around buildings by adding flat projected buildings images to generate a panoramic view of the city. I also corrected several artifacts of smoke rendering by adding more passes but maintaining the original smoke pass as a mask. I tweaked RGB channels to get a good mix of them, I have to create two different precomp “buildings and simulation” and “background city”, I decide to stress more the second explosion by making a color correction on the two final-precomp nodes, modifying the color of the sky, and also adding a “reflection pass” in the two buildings involved in the explosion to stress the brightness of the glass fragments, and finally increasing overall glow strength.
Conclusions
Making of “Mini destruction shot” was a great challenge for me, specially because I had to deal with heavy dynamic scenes using Maya Dynamics and PDI, besides it was a perfect scenario to learn the pros and cons of various choices that can lead to different results in different computation times, this knowledge will be very useful for me in the future when making bigger destruction sets professionally, I hope so. I think Pulldownit is an excellent plugin for collapsing buildings in Maya, it is fast and able to give satisfactory results in a short time allowing a good control of destruction in a few steps, this tool is evolving better and better really. Thanks to everybody for reading this article and watching my shot, remind to add a “Like” if you like it, of course you can ask me if you need more clarification.
Brief interview with Guillaume about his nice shot Possesed bed using Pulldownit
Why did you decide to make a possessed bed in CG? thats a crazy idea:)
I was looking for a new project involving fracturation/shattering. I had in memory a scene in The Conjuring where a rocking chair is thrown toward the characters, so I though an invisible demonic force would be a good reason to make an inanimate object move by itself and break apart while maybe hitting something.
I had the idea of a bed because it was interesting to mix rigid bodies simulation with cloth.
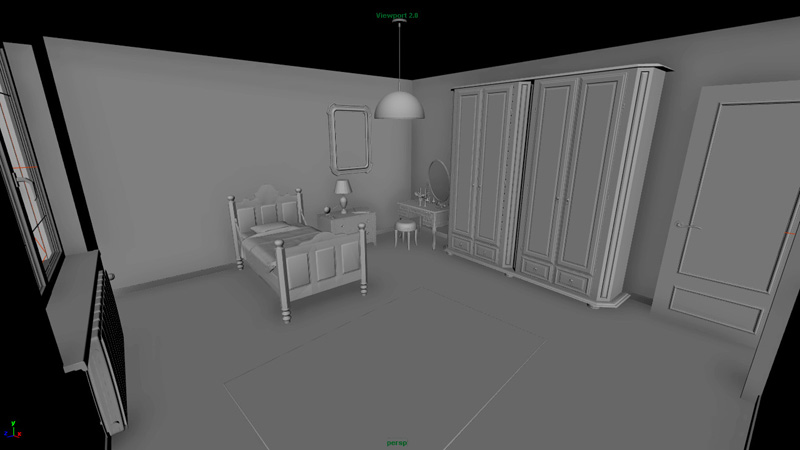
How did you model and rig the bed?
Actually all the furniture are free 3d models that I found on internet, but I had to re-model the bed because it was too high poly, the fracturation process as well as the simulation would have been too slow and buggy otherwise.
The rig is very simple : the wooden part is only animated with transform nodes : one when it levitates, and two for each part when it breaks. The transition is made simply by animating the visibility of objects.
The mattress, when kinematic, is skinned with two joints that follow the wooden parts, and there is a corrective blendshape.
How did you animate the mattress and the blanket?
The mattress is at first bound to the animation of the bed, the blanket becomes dynamic sooner but still have some points constrained to the same animation. After that it’s all a nCloth simulation with colliders.
Concerning the mattress, I tried a lot of settings trying to have the right behavior but nothing seemed to work. Then I had the idea of simulating only a thin sheet with a large collision distance, with a wrapped mattress model for the final render, and I think that was the best option, moreover it’s faster to simulate.
How did you setup Pulldownit dynamics?
For the long boards on the sides of the bed I used the wood splinters shatter style which was perfect for giving me a crack in the middle. For the front and back panels, I needed a more uniform shattering so I scaled down the panel in one axis, I applied a uniform shatter and then I scaled it back up, which gives similar long wood-looking fragments on all the model.
The piece in the center that breaks first is a fracture object, the two other parts are first a bunch of kinematic or dynamic objects, then it switches to two fractures bodies when it’s thrown at the door.
This last action is perform with a uniform field, it was neat to be able to use it for Pulldownit as well as for the nCloth.
How did you do the transition animation-dynamics for the bed?
Like I said in the rigging part, some objects that are 100% animated switches their visibility with simulated ones. It’s easy to do when the simulation starts when the object is at rest, but for the breaking parts at the top of the bed, I had to make a little script that keyed the state (kinematic to dynamic) of selected fragments at a given frame, as well as setting the initial velocities according to the animation( note: in Pulldownit v 2.7 and later the solver can do this effect by itself).
How did you do interaction between nCloth objects and Pdi objects?
Given that Pulldownit and nCloth can not mutually interact with each other in one solving, I had to proceed by steps.
First of all I made a pdi simulation with only the two remainings of the bed from when it falls back on the ground, and I converted it definely as keyed objects, to keep them for later.
Then I made two simpler models of the fractures and parented them respectively to a foot of the bed to match the overall animation. This is what I used as colliders for the cloth.
Finally I simulated all the smaller fragments, colliding with the geocached mattress, blanket, pillow and keyed / static objects.
To resume the heavier is influencing the lighter : halfs of the bed -> cloth -> small fragments.
Conclusions
The biggest challenge of the project to me was to make interact two solvers that doesn’t understand each other.
I lighted the scene with a portal and an area light but didn’t do a fully realistic render with everything shaded, because I only wanted to spend time on the effects part, which is what I want my speciality to be.
It was my first project using Pulldownit, but I have made some tests on other scenes and I really like the concept of fracture bodies with automatic clustering. There could be some improvements, for example I don’t like the fact that going on the first frame erases the cache, it happened to me a few time by mistake, but Pulldownit is still a young plugin and I’m sure there will be great new features to come.
Jordi Alavedra explains how he combined Pulldownit and a fluids solver for breaking several glasses with wine.
I started this project with the aim of testing how Pulldownit behaves along with Cg fluids, and also as a practice in the use of Pulldownit plugin which was pretty new to me. I decided to make a 3 glasses shot for being more genuine than the usual “wineglass breaking” . Besides looking at the web I hardly found any good test of Pulldownit and fluids, so I was a little scary about doing it, but I have to say it was much easier than expected.
Shattering with Pulldownit
PDi counts with several patterns to shatter the models, fist I did was testing them, I started using “local” shatter style, because of the easy of setting the exact impact point, however I discarded it later because the fragments generated looked more like egg-shell than broken glass, using “radial” style in around 200 fragments each glass and I got a high realistic look, I found out that I had only to adjust the pivot of the model to make cracks matching the impact point with the ball so it was perfect. However I needed the neck of the glasses to remain as one single piece so finally I splitted the glass in 2 parts using “Uniform” style before applying radial shattering.
My plot was breaking the glasses with Pdi, then add fluids in a second step, however I was worried about whether the weight of liquids would affect the way the glasses breaks or not, so I decided to test it by filling the objects with Maya nParticles, and setting the fragments as Maya nBodies and Pdi Fracture Bodies at the same time, it was perfectly possible and I baked a couple of scenes with different Pdi Fracture settings in this way. I had computed the same scenes previously without nParticles and after looking at one and another, although different results, fragments motion was convincing in all of them, however the scenes including nParticles took at least double slower to compute so I decided to get rid of that approach and compute Pdi dynamics without adding particles.
Dynamics with Pulldownit
So I set I fracture body for each glass and a Pdi body for the ball and make it break the glasses, that was easy and looked good, however I wanted the third glass to lean in addition to break, I had to try different things but finally it was possible using Pdi Advanced Fractures by increasing the hardness for the area near the neck of the third glass. I think PDi Advanced Fractures are difficult to play with at the beginning, but once you understand it, they are very powerful to adjust details in fracture.
The computation time with Pulldownit alone was around 5 min, pretty fast and I have to say very stable .I baked everything as Maya keys and saved the scene before going to fluids simulation.
Mixing Pulldownit & fluids
Second step was computing fluids, for that I had to export the original scene with unbroken objects and the final one with fragments and animation to the fluids application, both files were imported without troubles. I needed the original scene to fill the glasses with liquid, for that I created one emitter per glass, adding gravity I filled the glasses at the level I wanted, letting the liquid settle and setting this point at initial state for the fluids.
After that I had simply to replace all solid glasses for the broken ones, simply deleting them and importing the file with fragments and animation keys in its place, computing fluids took about 8 hours in my computer and meshing the liquids around 12 hours.
I imported the fluid meshes back in the Maya animation file, I removed all Pdi dynamics data to let only Maya keys in the scene and really nothing more, for my pleasure fluids and broken fragments matches perfectly when playing the scene, so it left just rendering everything.
Render the scene
Once I have the simulation of objects and fluids done, I had to set shaders and lighting for rendering the scene. I used IBL with HDRI studio lights, glass material was an easy one but shading the fluids took me a lot more, I was playing around with dielectric materials and different Mental-Ray materials, but I didn’t like the look, finally I made my own one, using a blinn material as basis, and adding ramps, surface info and so on to get the look I wanted.
I made some testing with different renders engines and finally decided to go with Mental-Ray because I got the best caustics using it, maybe because Im used to
it, I don’t know. It took 3 days to render both views, side and perspective, after that I did some color correction and deep of field adjustment in After Effects.
Conclusions
Im happy with the result I got, I know inst perfect, but quite believable I think, my first experience with Pulldownit was very good, it is easy to understand and a powerful plugin, my plot was breaking the glasses but two of them had to stand after collision with the ball and the last one leaning and fall, Pulldownit lets me the ability to do it, that’s dynamics control
Besides It was amusing to work with this plugin, fast response and stable, very nice. The integration with fluids was much easier than expected, it would be great to get involved in a professional project using both tools.
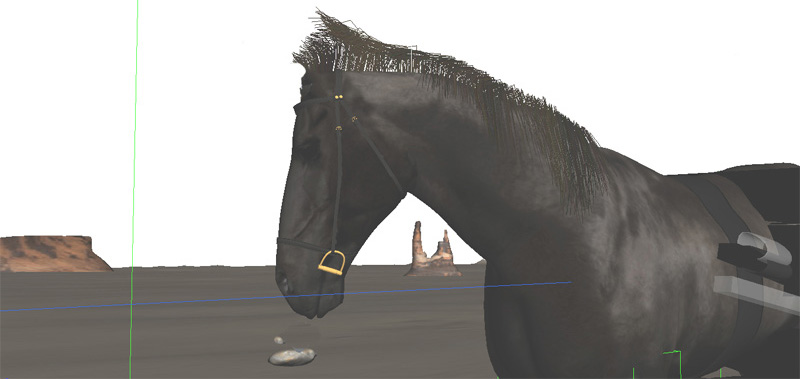
For this shot I had to test new features of Pulldownit 2.7, specially transition animation-dynamics capabilities. I needed and animated model made of diferent pieces and break it upon collision, Pdi wood shatter works very nicely so I decided to try with a cart, besides I had modeled a horse sometime ago so it was perfect for attaching the cart to it.
Animating the horse
The horse animation was made using a quadruped animation by layering techniques for the run-cycle instead the pose to pose or straight through techniques. You can find an amazing tutorial on how to animate a horse loop in this way here:
The hair of the horse was created with the Hair and Fur modifier in 3ds Max. The render mode of the hair was “geometry”, in order to get the depth of field of the Vray Camera rendered fine. The animation was made using the live mode dynamics.
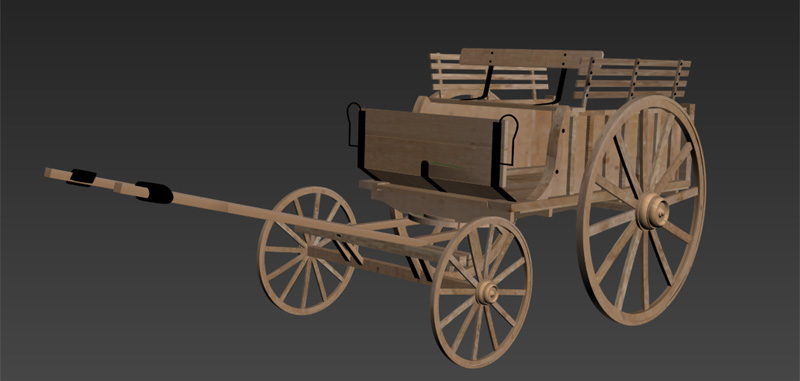
Modeling and animating the cart
To build the cart I used some vintage photos as reference. The model is made of diferent pieces and single planks in order to not having issues when shattering it, the fence was built in the same way. The cart was rigged in two parts; one attached to the horse and another one more “free”, so I can introduce some noise in the animation when the cart is running fast over the irregular terrain. I used a couple of dummy objects attached to the geometry to drive the motion of the car straight toward the fence and secundary motion with the terrain slopes, the front and rear wheels where grouped separately to make them spin around its axis. I used some vray dirt in the material diffuse so that we can have a stronger ambient oclussion look. Vray ambient oclussion was checked too.
Shattering the cart
I needed different parts of the cart to break different, I mean, wheels should break different than the deck of the cart for example, so first thing I did was separate the parts of the cart in different layers, chassis, front wheels, rear wheels, seats, and so on..then I started to shatter geometry per layer, making sure the active layer was the same of the current shatter operation, cart deck and footrest were shattered using wood style the rest of the cart was shattered using uniform style in a few fragments, 8 or so. Pdi 2.7 kept the animation of the parts after shattering, that worked perfect.
Setting the cart in dynamics
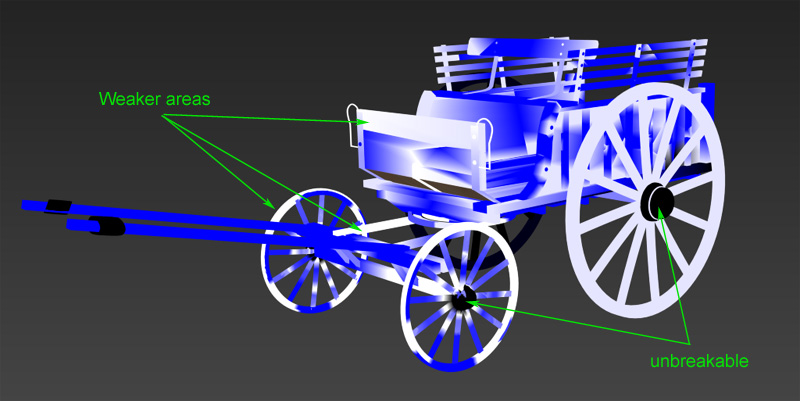
I created a fracture body per layer, in this way I could control the fracture of each part independently, as the cart is animated I set each fracture body as static and activation at frame in order to force them following the animation until colliding with the fence, I reduced clusterize to 0.0 and set local propagation far all pieces. Finally I used PDI advanced fractures to prevent some parts to break at all, the axis of the wheels, and most part of the deck and one of the rear wheels doenst break because of this.
Breaking the cart in dynamics
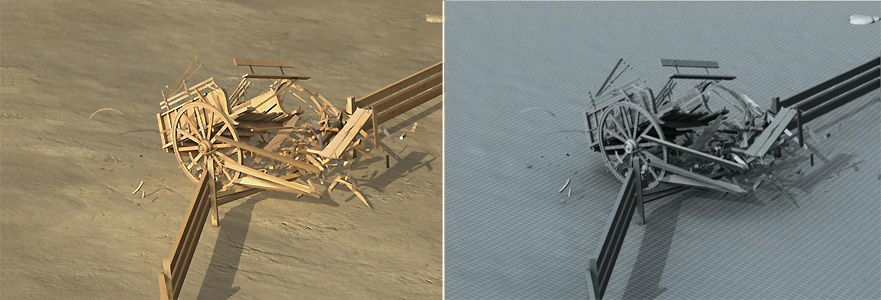
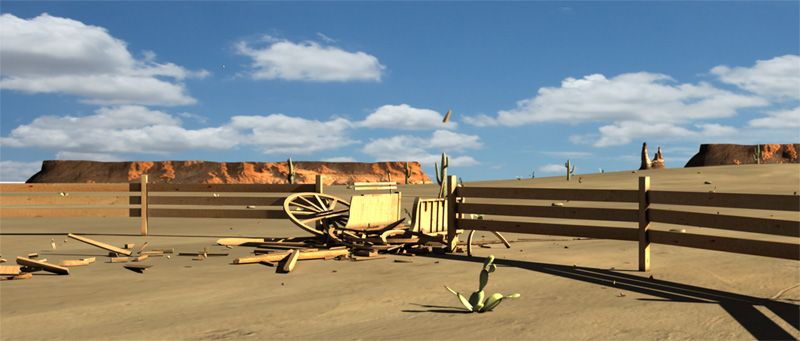
Despite the near 800 fragments involved in the simulation and the complexity of having 8 diferent fracture bodies in dynamics, Pulldownit computes the cart destruction very fast. However at my first tries the cart started to break too early, far before reaching the fence; I found out that the issue was caused because the cart was colliding with the terrain when moving and also different parts with each other, using new parameter “unbreakable until frame” was the key to solve it, just setting this parameter at a frame near to the fence solved the issue. Both the cart and the fence should get broken so I shattered the fence as wood splinters and created a new fracture body for it, however I set the fence as fully unbreakable using the new parameter in v2.7 to concentrate in the cart fracture first, it was as easy as disabling this parameter for making the fence breaking aswell once I was happy with the look of the cart destruction, that is another interesting use of this
For fine tuning of fracture and adjunsting the strenght of impact I tweaked hardness and damping parameters of each piece interactively, for doing it I hid all layers except the one I was computing, Pulldownit seems to get along very well with layers. When I was happy with the way each piece was fracturing I simply unhid all layers to bake the final result.
Conclusions
I think I got a believable breaking of the cart, Pulldownit 2.7 behave stable and fast, transition animation-dynamics worked nicely and new parameter “unbreakable until frame” was a must to get the pieces breaking at the right moment, using layers was key to can handle each piece separately