Tutorial: Oneiric temple destruction in 3ds Max

In this great tutorial Esteban Cuesta show us how to crack and destroy an oneiric temple using Pulldownit 5 in 3ds Max , he explains step by step how to create long cracks over the surface before destroying the whole model to get a nice crumbling effect, worth to review it.

Bounded cracks is a new feature introduced in Pulldownit 5.0
allowing to create cracks over the surface of 3d models and controlling the strenght and extent of the crack easilly.

Final shot here:

Thank you Esteban for this great tutorial !

Cracking an Ancient Statue in Maya

In this polished tutorial, Esteban Cuesta shows us how to create long cracks over
an ancient statue and shatter it using Pulldownit plugin in Maya,

Bounded cracks is a new feature introduced in Pulldownit 5.0
allowing to create cracks over the surface of 3d models and controlling the strenght and extent of the crack easilly.

Thank you Esteban for this great tutorial!

Shatter Text Effects in Maya with Pulldownit

In this new tutorial Esteban Cuesta show us how to create appealing 3d text shatter effects in Maya using new features for destruction included in Pulldownit 5, in a few and easy to follow steps he shows how to crack letters in diferent ways or turn a 3d text dynamic to get a nice crumbling effect, worth to review it.

More news are coming in September, until then have a great holidays!

Cracking a Moai statue with Pulldownit 5

Ideaform3d has published a nice tutorial showcasing Pulldownit new bounded cracks feature. The tutorial shows step by step how to create a crack along a Moai statue all inside Maya 2022 using PDI plugin,

Project files can be downloaded by clicking in the link included in the text of the tutorial below,

Ideaform3d is a youtube channel featuring nice and easy to follow tutorials showcasing useful plugins and scripts for Maya, 3dsMax and After Effects, worth to check it!

visit Ideaform3d Channel

Ancient Bridge earthquake by Andres de Mingo

Andres de Mingo,  author of this striking shot, kindly explains us how he did the dynamics effects using Pulldownit plugin inside 3ds Max.

I love those ancient bridges in Center Europe, with its old stones and statues plenty of history, I thought it would be dramatic seeing it being affected by a earthquake and tried to depict it in this little VFX project.

Cracking the bridge

The platform of the bridge is actually a large thin box textured with a combination of paving stones  and a grass shaders, I drawed a long 3ds max spline over the box and then used Shatter it tool to generate around 1000 shards around it, I added a second set of shards but this time making shatter width smaller and changing the Shatter Seed value to get a different pattern, finally I added an Uniform Shatter pattern of around 200 fragments to get rid of  too large shards appearing at both sides of the spline.

I created a PDI Fracture Body for the platform and a PDI Cracker along the spline, to speed up testing I set Local Propagation for the fractures, also to prevent fragments flying away too much I set a low value for the Cracker multiplier.

Making paving stones exploding

After I was happy with the main crack, I started adding more destruction on the bridge, for blasting  group of cobbles I reshattered the platform in different areas near the spline, this time using PDI Local Shatter, 200 shards per exploding area was enough,  following by creating clusters for each area, PDI Increase Selection tool is great for this, setting the cluster Hardness  to 0 and adding  a low break energy to get the exploding effect. Then I had just to set the break frame per cluster at the correct time to get the explosions happening one after another.

Crumbling the Statues

There are 5 statues on each bridge border, that’s makes a total of  10 models to shatter and destroy, this can be quite a lot of work, but I managed to speed up things by using some clever Pulldownit features.  I started by drawing a spline over the statue surface and creating a cracker for it,  then shattering the model with PDI path based style in around 300 shards, and adding an Uniform shatter pass of around 50 shards to get rid of large fragments on the model,  finally I added also a couple of small  PDI Local shatter shards in some borders of the statue.  By creating a fracture body and setting it to static and only break I got the statue crumbling nicely without breaking it completely.

But for the statues in the background I did it much simpler, I  made the model adquiring the shattering of the version in close up view, using PDI Adquire shatter style, then creating some cluster to make the statue starting crumbling at the desired frame , that’s did the trick perfectly.

Conclusions

This shot involved several models to be damaged and cracked, thanks to the easy of use and clever features of Pulldownit  I was able to have all destruction effects done and adjusted in a short time. I like specially  PDI Jagginess , this feature add detail to inner faces so cracks looks rough and more realistic when rendering the scene without having to create complex shader for them.

Icebreaker Avalanche by Andres de Mingo

Andres de Mingo   the author of this nice shot,  kindly explains us how he did the destruction effects using Pulldownit plugin in 3d Max.

It has been a stimulating experience working in this project, using Pulldownit in 3ds Max was easy and fun,  PDI get along very well with Particle Flow to add more debris.

Shattering the ice floor

iceCrack_top

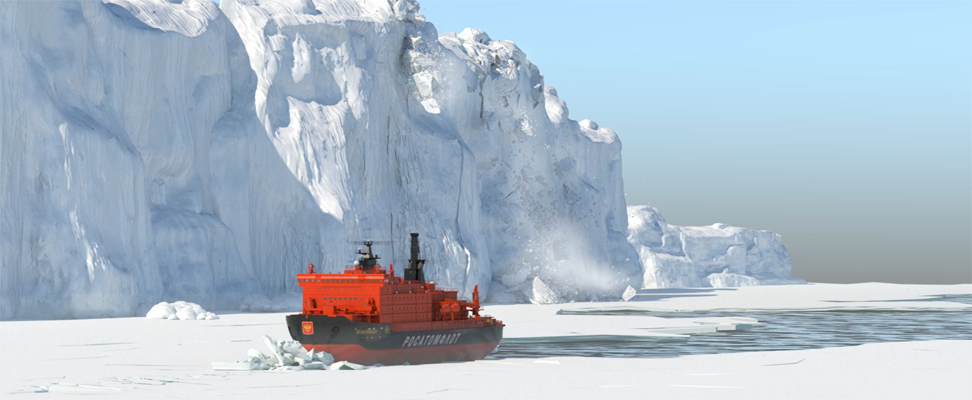
The ice is shattered in several stages, first I drew  a large spline crossing the ice in the middle and use Path-based shatter creating around 400 small shards,  then I applied a Uniform shatter on the whole ground to make all fragments rounded, 80 shards was enough for this. Finally I needed the area around the boat to have more fragments as they will break off in dynamics for this I put a thin box over the ground covering the area I wanted to reshatter and use it as a Shatterit Volume Shape with around 250 additional shards.

iceCrack_front

For the area behind the boat I simply deleted the shards in the middle manually,  for the rest I created a fracture body with Hardness 20 and Clusterize 0, I wanted the ice to break only in the boat area so I set it as Only break and Local Propagation also I set the hull of the boat as a kinematic body to can collide with the ice. When playing the scene the boat was colliding with the ice but several fragments interpenetrated the hull because they weren’t pushed away with enough strength. To fix the problem I created a Pdi Cracker object following the path just in front of the boat and running at its same pace, then I tweaked the Cracker impulse direction until getting the fragments pushed up and colliding with the hull afterwards nicely.

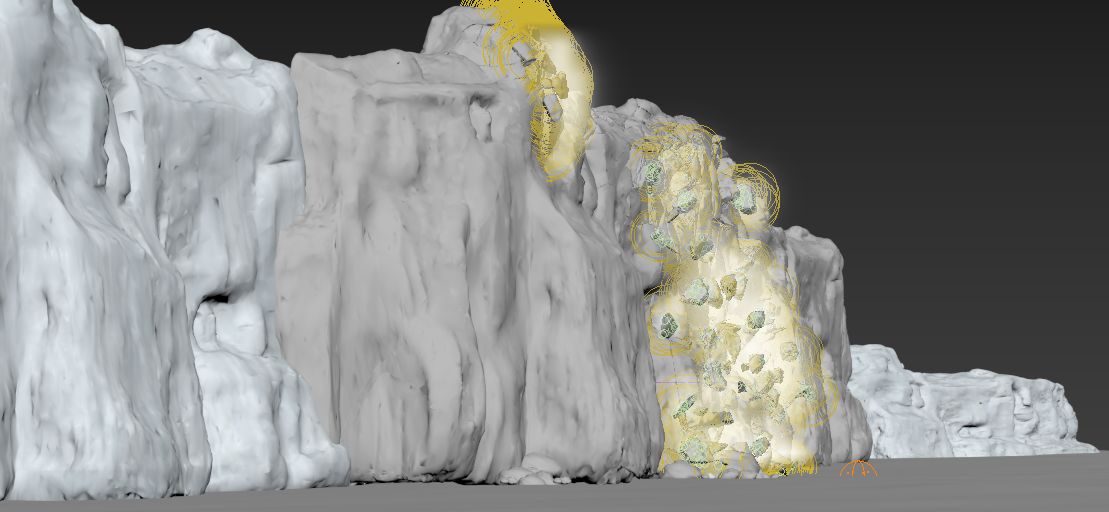
Making the cliffs avalanche

cliffsClusters

I wanted the cliffs behind the boat to start crumbling at some moment, for this I shattered three nearby peaks in around 125 shards each one using Local shatter, then I created a single fracture far all of them and set it as Static-Only Break and reduce it hardness to 10 units to make it overall very brittle. In order to trigger the destruction I created a cluster from the farthest peak adding some break energy and setting it  to start breaking at frame 90, after the boat has started to shatter the ice in front, I made the same with the second peak but this time making it starting to break  one second later and so on, in this way I got the feeling of the shockwave propagating across the cliff. That worked pretty well but some big fragments of the basis start to break off as well in a weird way, to fix the issue I set all fragments of the basis as static to prevent them moving at all.

Adding  more debris

pFlowDebri

I used Particle Flow in 3ds Max to add more debris to the cliffs destruction, that wasn’t difficult. I set a Position Object operator to use the PDI fragments as source for particles then I set a Spawn operator to emit more particles per frame. Finally I set a Shape Instance with a PDI fragment as source to instantiate the particles as geometry. Only trouble was some particles accelerated too much , I remove those weird particles by adding a Speed Test branching to a delete pFlow operators.

Adding  a falling snow effect

FumeFxViewport

The Cliff destruction already looked good but  I needed to add falling snow, I reused the same pFlow particles I have created before to emit smoke with FumeFx.  I didn’t want a dense avalanche of snow because this would hide the falling rocks behind, I just needed a soft covering of snow around the detached fragments.

Preventing the smoke to raise was the main trouble, I set a low temperature value, negative buoyancy (-5) and high dissipation values, finally I got a better look by setting Velocity Difusion to 50 units. The result I got isn’t perfect at all but I hope it gets the feeling of  snow around.

Finally I composed the snow pass in Fusion, adding some blur and adjusting the levels with the alpha gain.

final

Conclusions

It has been a stimulating experience working in this project, using Pulldownit in 3ds Max was easy and fun,  PDI get along very well with Particle Flow to add more debris, generating snow  was the most difficult part, Fume is great for smoke generation but honestly getting a falling snow behavior isn’t easy, next time I would like to try a more specific tool to simulate sand -like effects in addition to Fume.