Case study: Angry Orc Destroying Statues

Andres de Mingo   the author of this nice shot,  kindly explains us how he did the destruction effects using Pulldownit plugin in 3d Max.

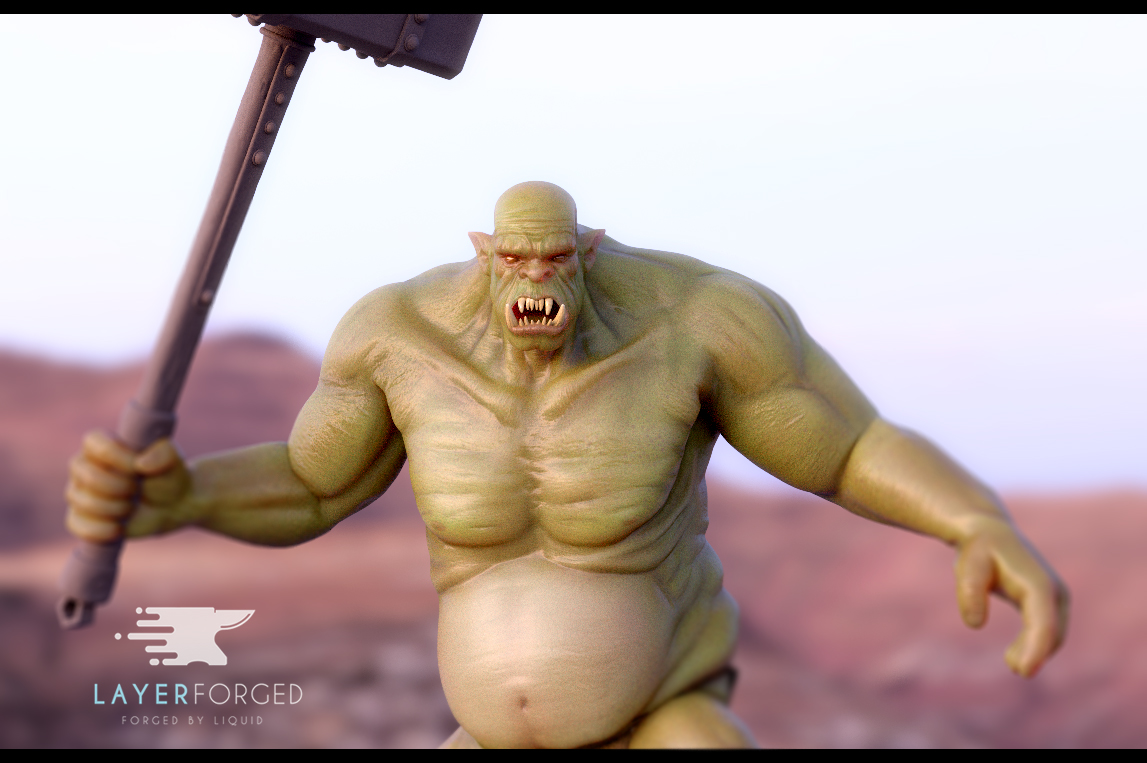
Cracking the last statue

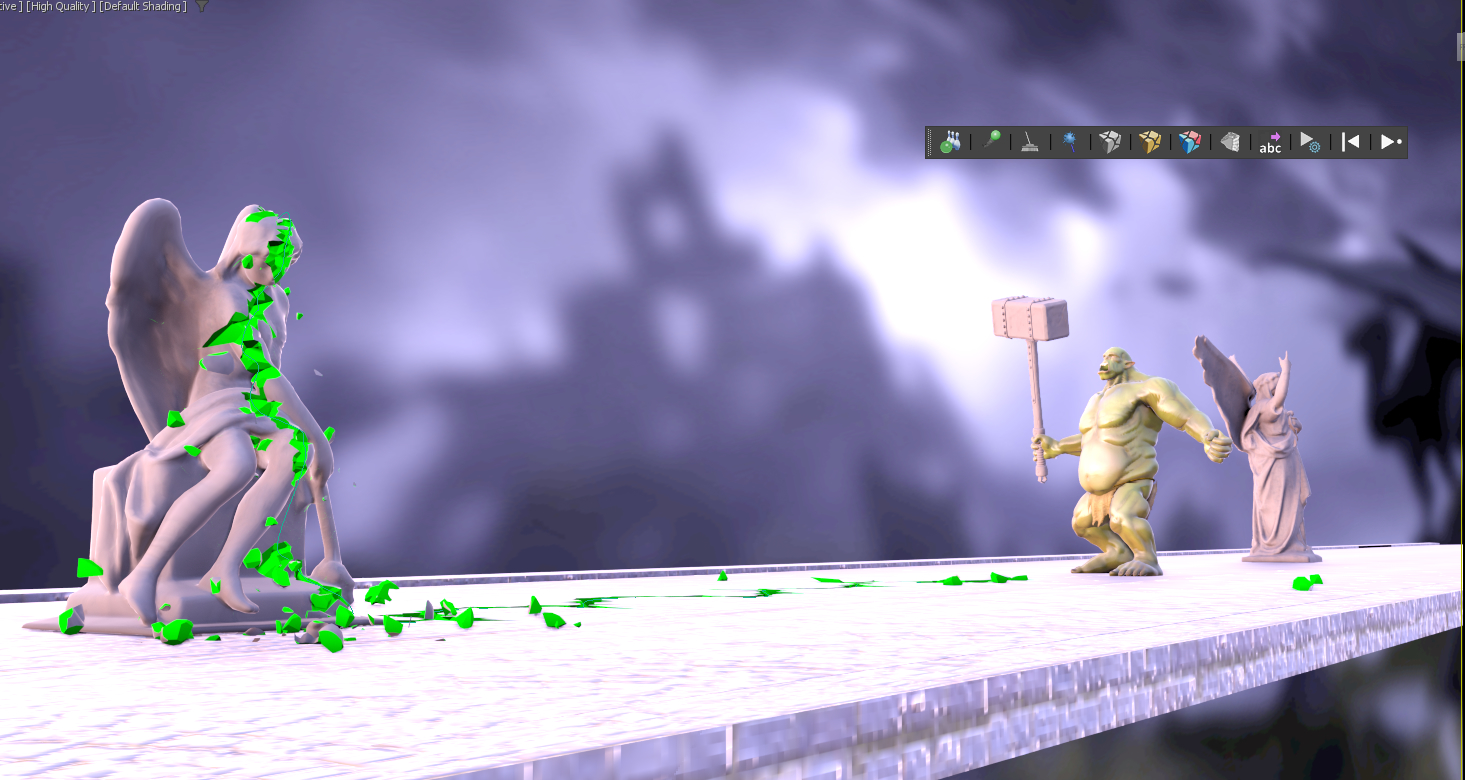
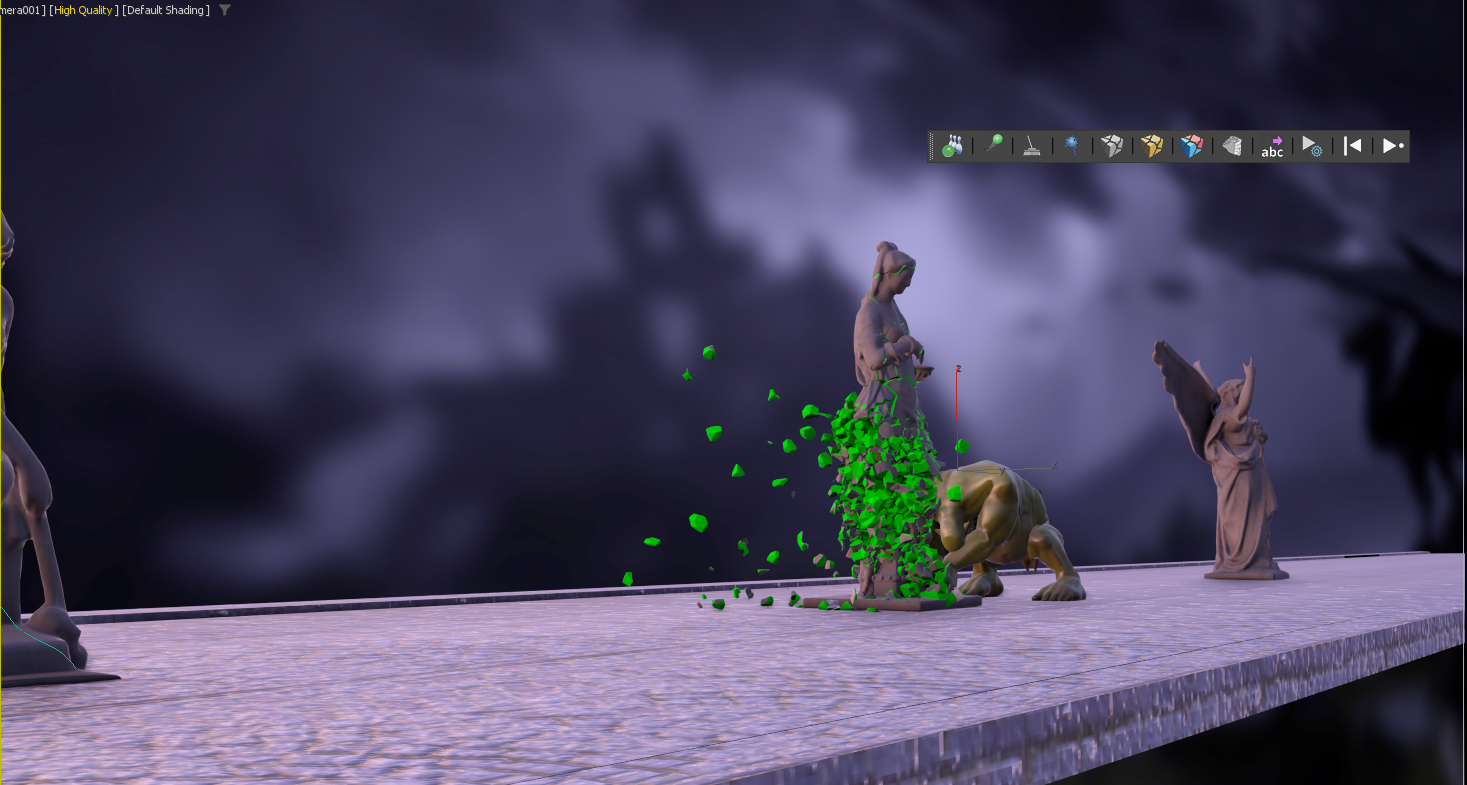
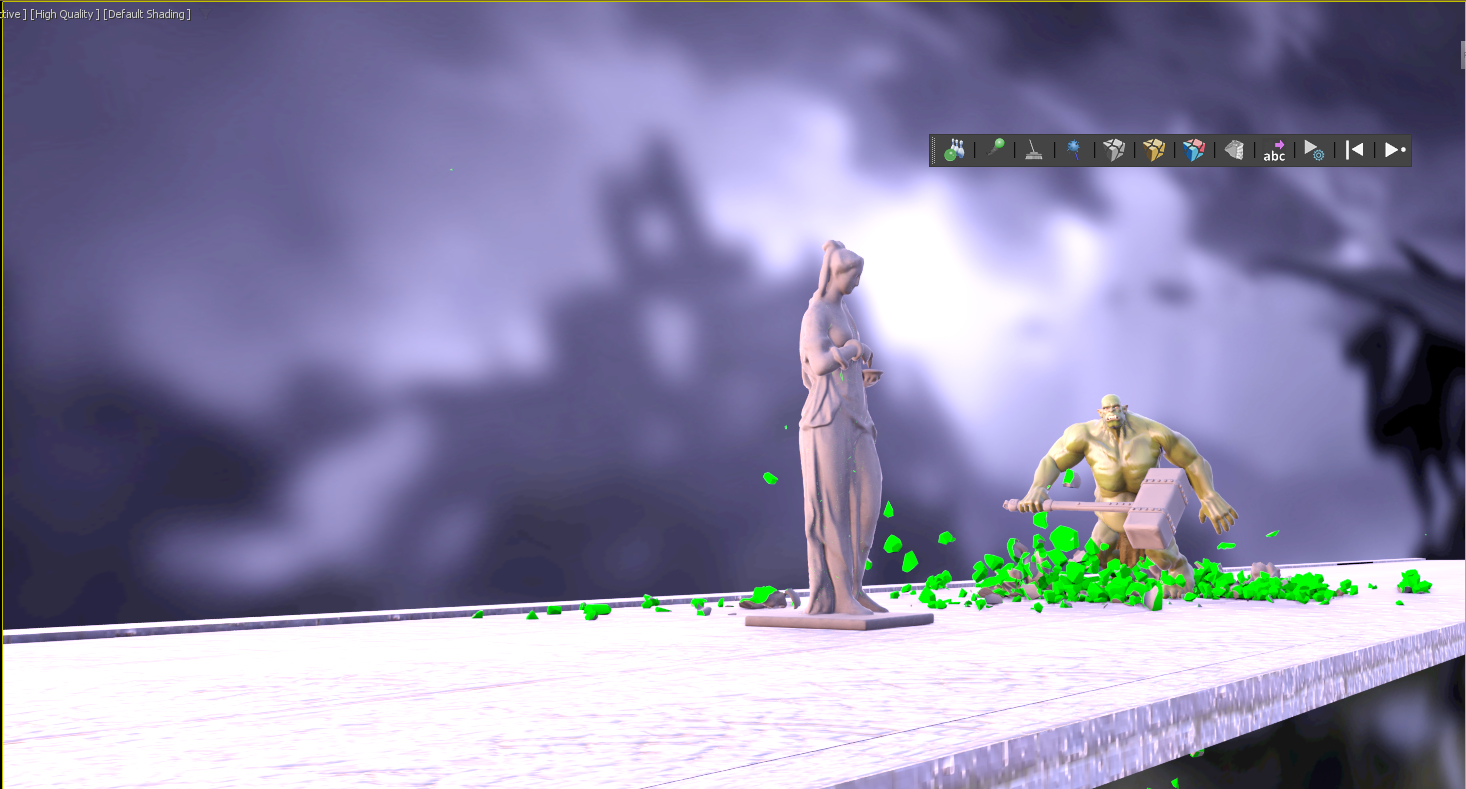
There are 3 statues  to break consecutively, first and second are destroyed completely but last one is only cracked by the shock wave happening when the Orc hits the ground with the hammer, I started doing this effect in first place by advancing the start time of Pdi simulation to set it just before the hammer hits the ground. I use the nice crackers feature of Pulldownit to do it. Also to speed up computation the orc itself wasn’t set in dynamics as  for this effect I needed only the hammer to be included , doing it in this way I got a fast playback rate for adjusting the destruction.

After the effect was done I baked simulation keys for the statue and cracked ground.

Destroying the second Statue

This was a more difficult effect as I wanted the statue to stay in place but being completely destroyed by the impact with the hammer, for this I shattered the statue in around 1000 shards, and reshattering it in 1000 shards again in the middle area by squeezing and displacing the shatter gizmo. After that I created a fracture body for it, setting its hardness value around 20 units to make it very brittle and PDi did the work nicely. This time I had to set the Orc also in simulation but computation time was fast anyway. As before I baked simulation keys for the statue before continuing with the shot.

Destroying the First Statue

I shattered the statue in around 2000 shards in the same way I did with the other one but setting its Fracture body as static “only breaks” because I didn’t want the fragments flaying away too much, this time the Orc was set as mesh ”animated” because it had to walk across the debris and kick them in his way to the next statue, but computation was still pretty fast, after I was happy with the destruction I baked animation keys for the statue.

Conclusions

You can find the orc and other nice models by Andres de Mingo in

https://www.layerforged.com/

,they offer  a wide variety of 3D printed resin miniatures for your modeling projects, role-playing games (DnD, Pathfinder, HeroQuest) and much more.

Choosing Leaning Direction before Breaking

This post is an extension of the “Cracking an Ancient Statue “ tutorial you can find here:

Some users has asked if it is possible to decide the leaning direction of a model before breaking it completely with Pulldownit; the answer is yes, you can do it  and very easily.

For choosing the leaning direction you have simply to select the fracture object in PDI Basic Fractures tab,  then go to Fractures->Dynamic Properties tab and set initial velocity according to your desired leaning direction, that’s all.

If your initial velocity parameter is greyed out you have to set Basic Fractures->Activation to “at frame” or “At first hit” to enable it. Here a demo video of the effect:

Notice the bigger initial velocity, the leaning will be faster, so better to set it to small values to get a natural motion of the model.

Tutorial: Oneiric temple destruction in 3ds Max

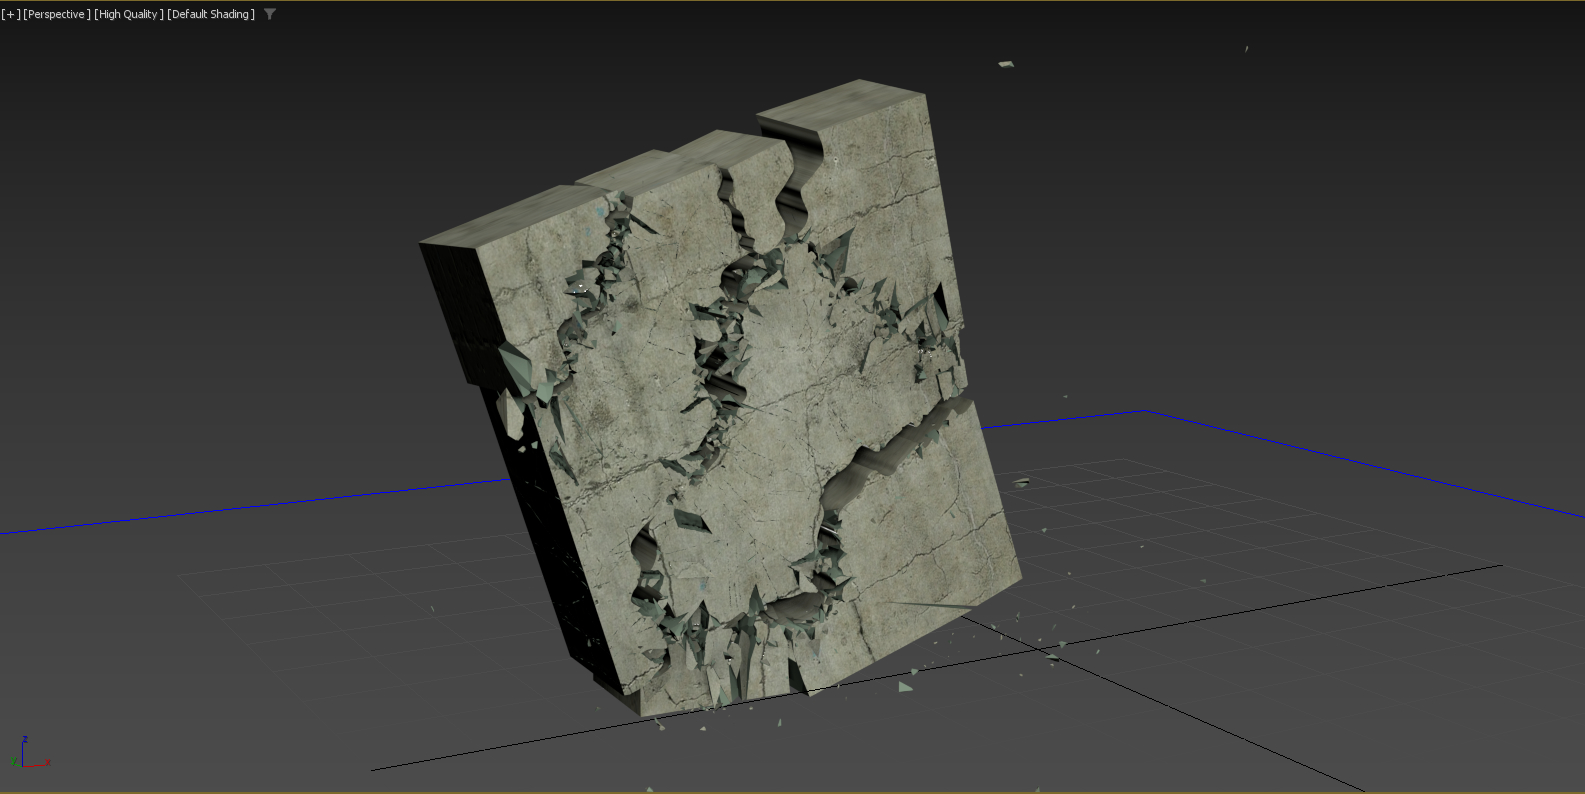
In this great tutorial Esteban Cuesta show us how to crack and destroy an oneiric temple using Pulldownit 5 in 3ds Max , he explains step by step how to create long cracks over the surface before destroying the whole model to get a nice crumbling effect, worth to review it.

Bounded cracks is a new feature introduced in Pulldownit 5.0
allowing to create cracks over the surface of 3d models and controlling the strenght and extent of the crack easilly.

Final shot here:

Thank you Esteban for this great tutorial !

Cracking an Ancient Statue in Maya

In this polished tutorial, Esteban Cuesta shows us how to create long cracks over
an ancient statue and shatter it using Pulldownit plugin in Maya,

Bounded cracks is a new feature introduced in Pulldownit 5.0
allowing to create cracks over the surface of 3d models and controlling the strenght and extent of the crack easilly.

Thank you Esteban for this great tutorial!

Tutorial: Abbey destruction in 3ds Max

Some of Pulldownit users has asked us how we did the stunning cathedral destruction in latest PDI reel, so we have decided to make a video tutorial explaining it step by step, and as you can see in the video below , it isnt dificult indeed,

Thank you to Esteban Cuesta for this great tutorial and final shot, please remember to “like” the video if you liked it:)

Shatter Text Effects in Maya with Pulldownit

In this new tutorial Esteban Cuesta show us how to create appealing 3d text shatter effects in Maya using new features for destruction included in Pulldownit 5, in a few and easy to follow steps he shows how to crack letters in diferent ways or turn a 3d text dynamic to get a nice crumbling effect, worth to review it.

More news are coming in September, until then have a great holidays!

Cracking a Moai statue with Pulldownit 5

Ideaform3d has published a nice tutorial showcasing Pulldownit new bounded cracks feature. The tutorial shows step by step how to create a crack along a Moai statue all inside Maya 2022 using PDI plugin,

Project files can be downloaded by clicking in the link included in the text of the tutorial below,

Ideaform3d is a youtube channel featuring nice and easy to follow tutorials showcasing useful plugins and scripts for Maya, 3dsMax and After Effects, worth to check it!

visit Ideaform3d Channel

Pulldownit for Maya 2019

Pulldownit plugin is already available for Maya 2019,  you can download it from the users area if you have licensed the plugin or download demo version from the web site in case not. You can review latest features and demos of Pulldownit 4.5 here:

Pulldownit 4.5 for Maya new features

There was a great expectation about Maya 2019 because it was taken much longer than usual to be released, many users’ thoughts were about some big new feature was coming, but finally Autodesk has focused this release in usability of the tool and performance by presenting an impressive long list of bugs fixes and a few but important improvements when using the software in production.

The major enhancement in Maya 2019 is the new cached playback feature, by using it you can speed up the playback of complex scenes or get a sustained frame rate  directly in the viewport removing the need to playblast the scene to review  issues, in addition you can modify keys freely and the cache auto updates quickly taking in account the changes so you get indeed a faster workflow specially for animation. Cached Playback is intended to be used with keyframed characters or some types of cached animations so all the dynamics solvers inside Maya: Nucleus, MASH, XGEN etc.. doesn’t support it. The same happens with Pulldownit, you cannot activate cached playback while computing dynamics however after baking keys and delete all PDI bodies you can enable it to speed up the playback in viewport, in our tests with scenes including around 1000 fragments this new Maya cache double the viewport FPS running at near 70 FPS, and if you export the destruction to Alembic the playback is even faster reaching a speed to around 90 FPS in average. Here a quick tutorial about using  Maya 2019 cached playback with Pulldownit simulations:


There are other improvements regarding animation keys, two new filters has been added, Butterworth and Key Reducer, the first one is intended to clean noise in animation capture data and the second is useful to remove needless keys in the animation.

Besides the integration of Arnold Render in Maya is becoming deeper with each update, in version 2019 you can use Arnold render inside one Maya viewport or render regions directly in the viewport 2.0

Autodesk also claims complex scenes now load faster and interactions with viewport 2.0 are quicker, in our experience that’s true so far, so even if some people is disappointed for the lack of brand new features in other fields we think Autodesk has done it right making Maya faster and more reliable in this release, users should notice it in his everyday work.

Running Maya Linux in Optimus Laptops

Autodesk Maya runs in Linux systems as a charm, fast and stable, you may have experiment it if working in some of the large studios which uses Maya Linux extensively, so let’s say you are used to Linux and decide to install Maya at home but if your computer has an NVidia Optimus GPU, and all modern laptops has this kind of card, you are going to get in troubles because NVidia hasn’t released a proper driver for Optimus GPUs in Linux and it seems they haven’t plans to release it, so what to do?

What is an Optimus GPU?

Optimus cards are actually a dual GPU, one card( INTEL) is welded in the motherboard and connect directly to the screen, this card is very limited, just able for 2D drawing and basic 3D features, not valid for using Maya,  specially it can´t support Viewport 2.0,  then there is another card( NVIDIA), a more powerful GPU which handles all the heavy 3D stuff, it is supposed this card auto activates when the system detect the application you are using needs demanding 3D features. The idea of a dual GPU is nice, because you save battery power by using only the basic card when running 2D applications or system menus and heavy 3D features are enabled by applications or games which needs it saving your battery and besides keeping the laptop temperature lower, all of this happens in Windows system but not in Linux because the lack of a proper driver by NVidia.

optmusPipeline

Making it work

There are two different strategies for making Optimus work in Linux, the simplest one is deactivating the INTEL card in BIOS so the system is forced to use the NVIDIA card always at the expense of your battery power, sadly only a few hi-end laptops allows to setup this feature in BIOS.

The other way is using a software bridge between both cards, at the beginning there was only BumbleBee, an independent software project which uses VirtualGL or Primus to communicate both GPUs,  there is a performance penalty when using these libraries and besides it doesn’t work with all applications, sadly Maya is one of them, in our tests using BunbleBee Maya launches with Viewport 2.0 but it crash by simple interactions with the keyboard, so no way.

Luckily in the middle 2016 NVidia itself fixed partially its Linux drivers to can do the switch between both cards in a fast way by using what is called NVIDIA-PRIME capabilities, this mechanism has a few limitations and needs an special configuration of your system to work which sadly it isn’t explained clearly in NVidia docs.

Installing NVIDIA-PRIME

We have been able to install NVIDIA-PRIME in an Optimus laptop with CentOS7 following this excellent guide by Ezequiel Mastrasso,

guide to install NVIDIA-PRIME in Centos 7

Some comments about our own experience with installation if this can help to someone:

In step 2 of the guide Ezequiel says a Xorg with ABI 24 is needed but according to NVidia ABI 23 is supported and actually our system is using elrepo kernel 4.19 which features Xorg ABI 23.

In step 18 of the guide our system turned black screen, but rebooting and skipping directly to step 19 did the trick, the rest of the guide worked perfectly for us.

Actually our system is a dual boot Windows 10 /Centos 7, this didn’t affect in anything the installation of NVidia-PRIME.

Finally before starting the Optimus setup we recommend to install and run nvidia-detect by elrepo, this little utility will shows up the exact NVidia driver your system needs and also check compatibility with your current Xorg server and displays its ABI number.

In our tests using this setup Maya Viewport 2.0 works perfect and Unigine benchmark seems not having any noticeable performance loss by using NVidia-PRIME .

Nevertheless, as Ezequiel mention this configuration is pretty sensitive to system changes, for example in our case NVidia-PRIME mechanism got broken just by installing the mesa-lib-GLU library, but luckily reinstalling the Nvidia driver again fixed it instantly, anyway it is a good idea to make a system backup when you manage to get it working just in case.

Hope this article helps you to enjoy Maya linux and of course Pulldownit plugin in your brand new Optimus laptop!

mayaRunningwithOptimus


Alembic Caching of PDI scenes in Maya

Alembic caching is a popular format to exchange animated assets between applications,  indeed Alembic is supported by most 3D platforms today.

Besides Alembic is an efficient method  to extract  raw animation data from meshes so by  caching the object you get rid of any computation applied to the mesh in this way complex scenes and animations can be exported as an Alembic file, and then re-imported into Maya to improve playback performance.

Pulldownit supports Alembic caching in Maya and 3ds Max, in the tutorial below Esteban Cuesta shows us how to cache a PDI simulation with Alembic in the way  we store one single mesh per fracture object.

Important to mention Alembic doesn’t save shaders applied to the mesh, but only a reference to them so to can see  the materials applied to the mesh  they must be present in the scene before loading the alembic file.

go to Alembic Caching in Maya docs