Pulldownit 5.5 is here and comes with useful updates, Shatter it tool has been multithreaded and highly optimized, getting up to 8x faster shattering with regards to previous release. Chipping areas of the model is also faster and you can discard shatter centers directly in the viewport just by clicking the mouse over it.
Bounded Cracks introduced in version 5.0 has been enhanced with the ability to turn them dynamic at the desired frame, allowing to create easily stress cracks that ends up tearing the surface completely at some moment.
Working in complex destruction scenes is easier and more intuitive, in cases of many objects colliding, dynamic solver has been adjusted to get nice fracture results with default parameters and when two objects impact each other you can decide which one will break in first place simply by reducing its hardness value.
Maya Cache Playback is now supported after baking simulation keys for the whole scene, this allows user to play the simulation at a fast, sustained rate and recover dynamic data afterwards to make changes if needed.
There are also useful improvements to the UI, you can modify parameters for several fractures at once and create several crackers at once or toggle display of all crackers paths with one click.
Last but not least we have fixed quite a few annoying issues from previous version, making the tool more predictable and reliable than ever.
You can review below all performance and usability improvements and you can check the whole list of fixes in the Pulldownit version logs page:
Licensed users can access already Pulldownit 5.5 from his account and there is a demo version for Maya 2023 in the Thinkinetic web site.
Shatter New Features
Shatter it multithreaded along with other performance improvements that makes shatter an object in hundreds and thousands of pieces around 8x faster than in previous release.
New ability to remove shatter centers directly in the viewport, when in Shatter it draft mode simply by clicking mouse + ctrl key, the selected shatter center is deleted.
Dynamics New Features
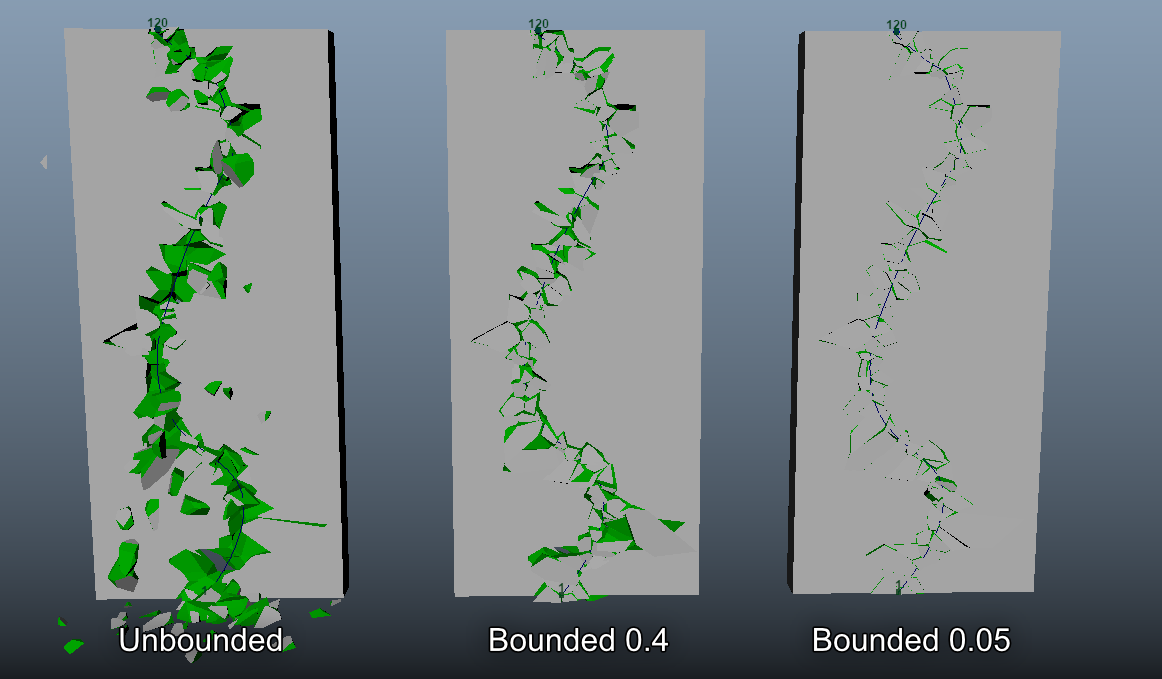
New ability to generate Bounded Cracks until frame , stress crack propagation can be set to last until desired frame, after that it continues as an usual dynamic crack.
Initial velocity can be set for “activation at frame” fracture bodies, linear and angular velocity can be added to static fractures bodies, setting in this way the initial motion direction when the object becomes dynamic.
More intuitive behaviour in collision between fracture bodies, user can decide which of them will break in first place simply by reducing its hardness value. Besides small fragments collisions don’t trigger fracture anymore, therefore fracture activation starts always at the exact impact moment between the two objects.
UI Enhancements
Maya Cache Playback supported after baking PDI keys for the whole scene, deleting PDI data before using Maya Cache Playback is no longer needed, allowing to recover simulation afterwards to make changes if needed.
New option to auto clean all PDI data after baking simulation, this new option allows to use Maya Cache Playback at the fastest speed right after baking PDI keys.
New ability to set parameters for several fracture bodies at once. New ability to edit name of selected Cracker. New ability to show/hide all Crackers paths at once. New ability to set parameters for several Crackers at once. New ability to create Crackers for all selected curves at once.
Black Friday/Cyber Monday is here!, at Thinkinetic we are offering 20% Off in all our licenses for Autodesk 3ds Max or Maya, including one year of support and updates.
If you think our destruction tools can be useful for your Cg projects next year, that’s a good deal!, just visit thinkinetic shop when you are ready, discount is already applied in the final cost, no special code needed.
Actually many companies in the CG market are offering important discountsup to 50% Offin useful VFX and 3D tools, you can find them listed nicely in these great sites,
In this great tutorial Esteban Cuesta show us how to crack and destroy an oneiric temple using Pulldownit 5 in 3ds Max , he explains step by step how to create long cracks over the surface before destroying the whole model to get a nice crumbling effect, worth to review it.
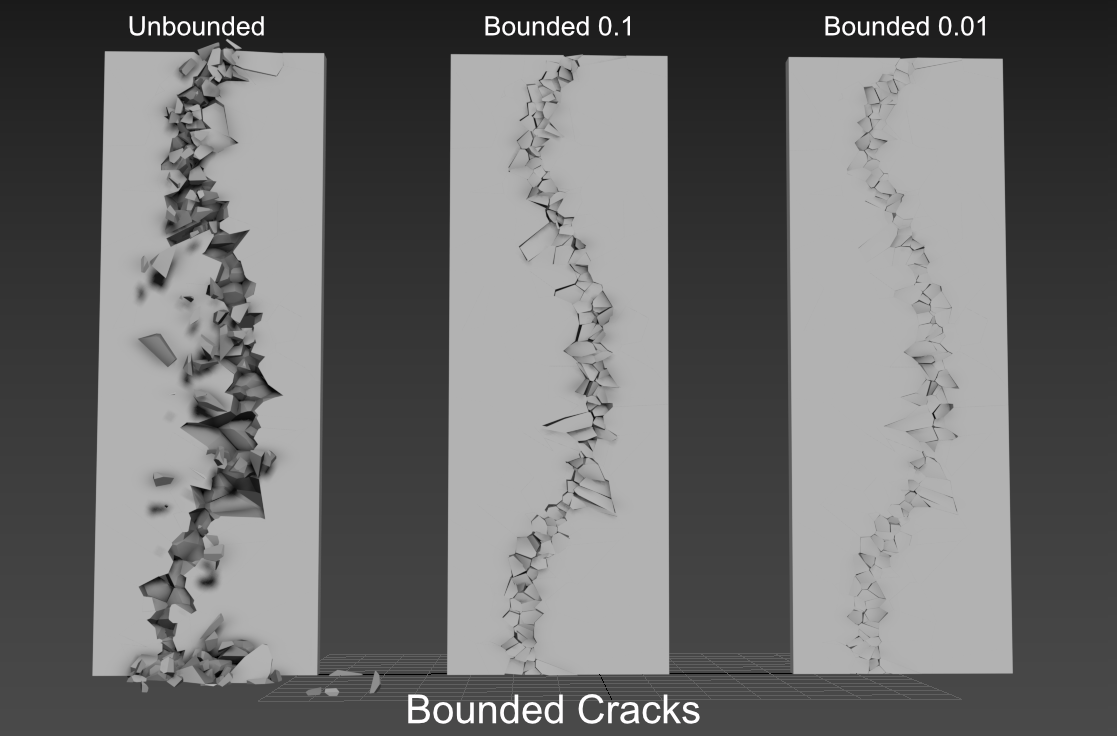
Bounded cracks is a new feature introduced in Pulldownit 5.0 allowing to create cracks over the surface of 3d models and controlling the strenght and extent of the crack easilly.
Some of Pulldownit users has asked us how we did the stunning cathedral destruction in latest PDI reel, so we have decided to make a video tutorial explaining it step by step, and as you can see in the video below , it isnt dificult indeed,
Thank you to Esteban Cuesta for this great tutorial and final shot, please remember to “like” the video if you liked it:)
Pulldownit 5 for 3ds Max brings new destruction features and important updates in performance and usability.
Fractures solver computes around 2 times faster and gets more debris in impact areas without the need of further adjustment.
A new ability to shatter along part of a curve lets user refine cracks as many as needed in a visual way, surface cracks can be bounded to create easily nice stress effects and reversing a crack involves just one click, all of this making the creation and adjustment of surface cracks easier than ever.
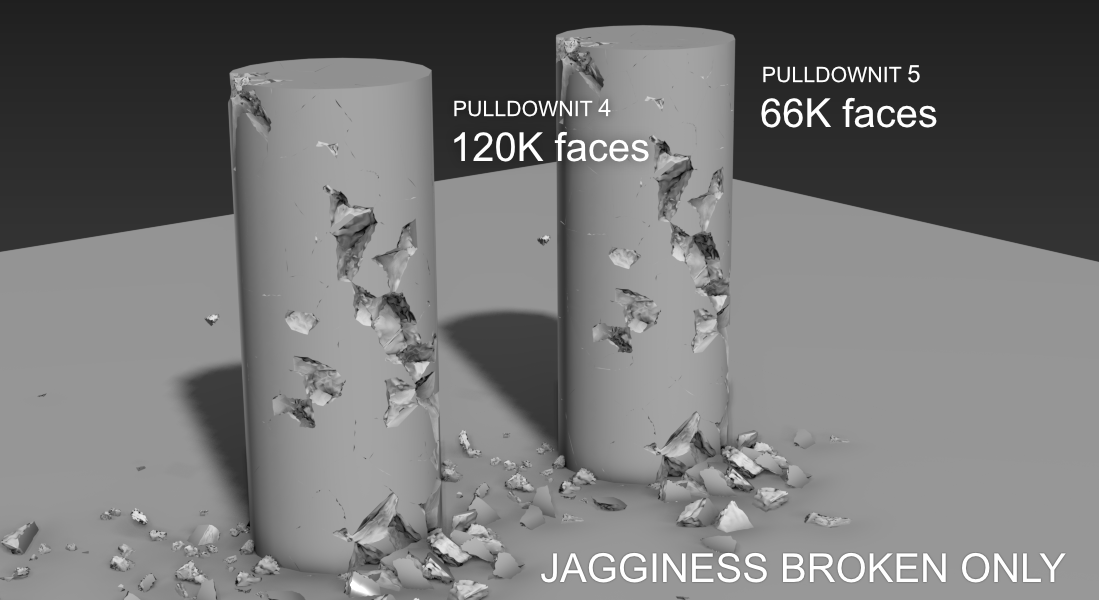
Jagginess, the ability to add roughness to cut faces, receives also an important update, by default jagginess now only applies to broken areas in simulation, getting lighter meshes for rendering or when exporting it to game engines.
There are several other performance and usabilityimprovements you can review below and you can check the whole list of fixes in the Pulldownit version logs page:
Licensed users can access already Pulldownit 5 from his account and there is a demo version for 3ds Max 2022 in the Thinkinetic web site.
Shatter New Features
New Extent parameter for Shatter it tool, this new parameter allows to shrink the shatter region in a visual way, making very easy to increase the density of fragments in any area of the model.
New ability to exclude part of the curve in Shatter it, simply by dragging the mouse you can select the extent of the curve to be used for shattering, as many times as needed, therefore one single curve is enough for all reshattering operations.
Jagginess applies to broken fragments only, by default Jaggines now only applies to the areas which has been broken in simulation, getting lighter meshes for rendering or exporting it to game engines.
Dynamics New Features
PDI Fracture Solver 2x faster, scenes involving hundreds or thousands of fragments in dynamics now computes around 2 times faster with the same stability than previous version
Improved quality of Fracture solver, cracks are now more realistic, pulling out small fragments in borders of fracturing areas without the need of further adjustment.
New bounded behaviour for crackers, user can now control the distance detached fragments can move, from making them stick on the surface to let them free and falling.
UI Enhancements
New ability to reverse Cracker direction, reverse a dynamic crack is now as easy as click on the panel button.
Create fracture body 2x faster, fracture bodies made of thousands fragments now needs only a few seconds to be created by PDI solver.
Create and modify fracture clusters is an almost instant operation.
Improved visualization in Stresses View, when in Stresses View all fragments are now displayed in solid colour, regardless of its material.
Stresses view “break at frame” clusters are now displayed in green color, in this way user can quickly identify clusters set to break at frame( green) from the rest.
In this new tutorial Esteban Cuesta show us how to create appealing 3d text shatter effects in Maya using new features for destruction included in Pulldownit 5, in a few and easy to follow steps he shows how to crack letters in diferent ways or turn a 3d text dynamic to get a nice crumbling effect, worth to review it.
More news are coming in September, until then have a great holidays!
Ideaform3d has published a nice tutorial showcasing Pulldownit new bounded cracks feature. The tutorial shows step by step how to create a crack along a Moai statue all inside Maya 2022 using PDI plugin,
Project files can be downloaded by clicking in the link included in the text of the tutorial below,
Ideaform3d is a youtube channel featuring nice and easy to follow tutorials showcasing useful plugins and scripts for Maya, 3dsMax and After Effects, worth to check it!
Pulldownit 5 for Maya is here! and brings important updates in performance and usability, fractures solver now computes at least 2 times faster and gets more debris in impact areas without the need of further adjustment.
Create long surface cracks is now much easier, a new ability to shatter along part of a curve, lets user refine the crack as many as needed in a visual way. Reversing dynamics cracks involves just one click, besides surface cracks can be bounded, so broken fragments are forced to stick on the surface or fall as desired.
Jagginess, the nice ability to add roughness to cut faces, receives also an important update, by default roughness now only applies to broken areas in simulation, getting much lighter meshes for rendering or when exporting it to game engines.
There are several other performance and usability improvements you can review below and you can check the whole list of fixes in the Pulldownit version logs page:
Licensed users can access already Pulldownit 5 from his account and there is a demo version for Maya 2022 in the Thinkinetic web site.
Shatter New Features
New Extent parameter for Shatter it tool, this new parameter allows to shrink the shatter region in a visual way, making very easy to increase the density of fragments in any area of the model.
New ability to exclude part of the curve in Shatter it Draft Mode, simply by dragging the mouse you can select the extent of the curve to be used for shattering, as many times as needed, therefore one single curve is enough for all reshattering operations.
Jagginess applies to broken fragments only, by default Jaggines now only applies to the areas which has been broken in simulation, getting much lighter meshes for rendering or exporting it to game engines.
Dynamic New Features
PDI Fracture Solver 2x faster, scenes involving hundreds or thousands of fragments in dynamics now computes at least 2 times faster with the same stability than previous version.
Improved quality of Fracture solver, cracks are now more realistic pulling out small fragments in borders of impact or detaching areas without the need of further adjustment.
New bounded behaviour for crackers, user can now control the distance detached fragments can move, from making them stick on the surface to let them free and falling.
New Add Particles option “Visible Faces Only”, when combining fragments to emit from, this new option spread nParticles only over the visible faces of the combined node.
UI Enhancements
Load PDI scenes 2x faster, massive destruction scenes now load at least 2 times faster in Maya.
New ability to reverse Cracker direction, reverse a dynamic crack is now as easy as click on the panel button.
New option to update Cracker Path when user changes reference curve.
Create fracture body 4x faster, fracture bodies made of thousands fragments now needs only a few seconds to be created by PDI solver.
Stresses view “break at frame” clusters are now displayed in green color, when in Stress View user can differentiate easily clusters set to break at frame( green) from the rest.
Create fracture cluster is now an almost instant operation.
Andres de Mingo, author of this striking shot, kindly explains us how he did the dynamics effects using Pulldownit plugin inside 3ds Max.
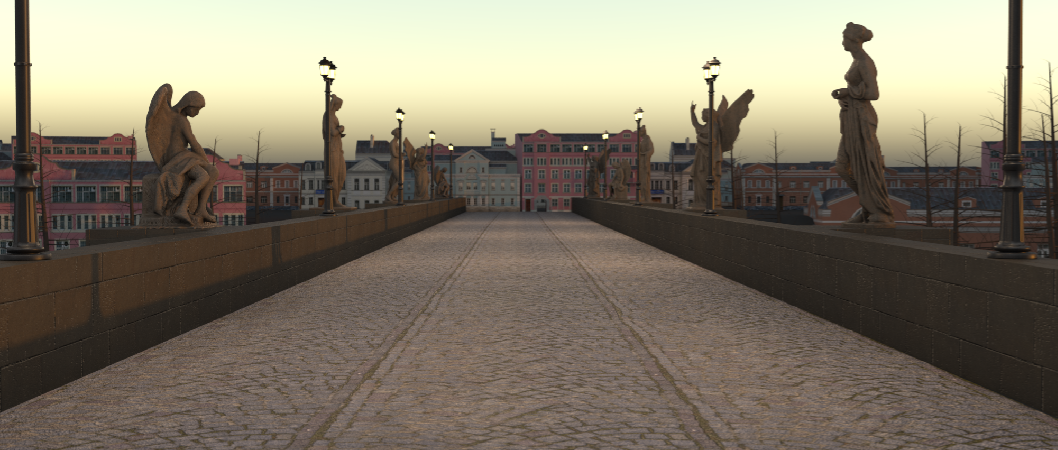
I love those ancient bridges in Center Europe, with its old stones and statues plenty of history, I thought it would be dramatic seeing it being affected by a earthquake and tried to depict it in this little VFX project.
Cracking the bridge
The platform of the bridge is actually a large thin box textured with a combination of paving stones and a grass shaders, I drawed a long 3ds max spline over the box and then used Shatter it tool to generate around 1000 shards around it, I added a second set of shards but this time making shatter width smaller and changing the Shatter Seed value to get a different pattern, finally I added an Uniform Shatter pattern of around 200 fragments to get rid of too large shards appearing at both sides of the spline.
I created a PDI Fracture Body for the platform and a PDI Cracker along the spline, to speed up testing I set Local Propagation for the fractures, also to prevent fragments flying away too much I set a low value for the Cracker multiplier.
Making paving stones exploding
After I was happy with the main crack, I started adding more destruction on the bridge, for blasting group of cobbles I reshattered the platform in different areas near the spline, this time using PDI Local Shatter, 200 shards per exploding area was enough, following by creating clusters for each area, PDI Increase Selection tool is great for this, setting the cluster Hardness to 0 and adding a low break energy to get the exploding effect. Then I had just to set the break frame per cluster at the correct time to get the explosions happening one after another.
Crumbling the Statues
There are 5 statues on each bridge border, that’s makes a total of 10 models to shatter and destroy, this can be quite a lot of work, but I managed to speed up things by using some clever Pulldownit features. I started by drawing a spline over the statue surface and creating a cracker for it, then shattering the model with PDI path based style in around 300 shards, and adding an Uniform shatter pass of around 50 shards to get rid of large fragments on the model, finally I added also a couple of small PDI Local shatter shards in some borders of the statue. By creating a fracture body and setting it to static and only break I got the statue crumbling nicely without breaking it completely.
But for the statues in the background I did it much simpler, I made the model adquiring the shattering of the version in close up view, using PDI Adquire shatter style, then creating some cluster to make the statue starting crumbling at the desired frame , that’s did the trick perfectly.
Conclusions
This shot involved several models to be damaged and cracked, thanks to the easy of use and clever features of Pulldownit I was able to have all destruction effects done and adjusted in a short time. I like specially PDI Jagginess , this feature add detail to inner faces so cracks looks rough and more realistic when rendering the scene without having to create complex shader for them.
Pedro Ivan de Frias the author of this stunning shot, kindly explains us how he did the destruction effects using Pulldownit plugin in 3d Max.
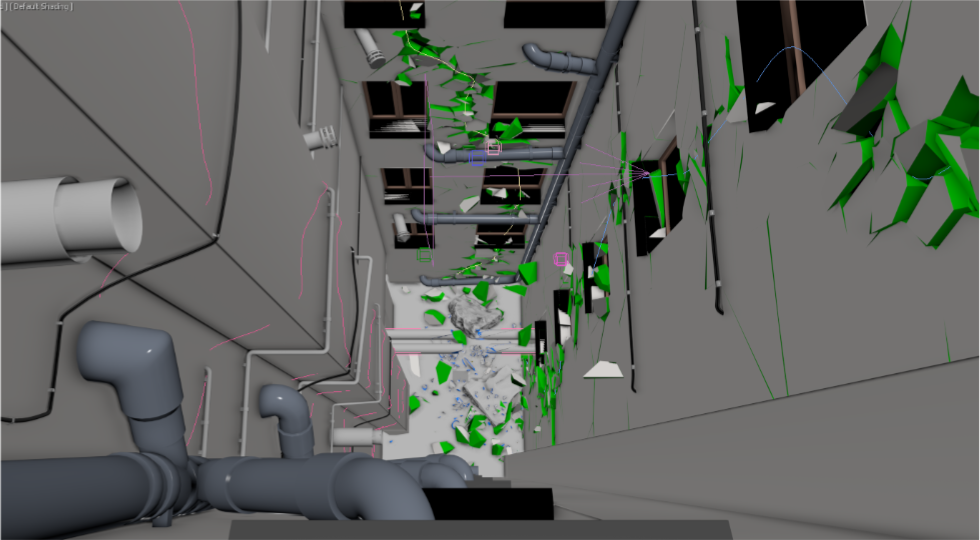
This shot was a challenging project because of the amount of different elements fracturing and by other side, due to the close proximity of the camera to the walls, shards had to be generated less polygonal to look real in close-up cracks and detachments . My approach was to work it out in several stages, one for each wall being destroyed, then adding more elements in simulation when I was happy with the overall look and timing of the previous stage.
Cracking the walls
For cracking the front and side walls I followed the same procedure, first drawing a spline over the surface going from the bottom to the rooftop, this is very easy thanks to the great freehand splines in 3ds Max, then using PDI Path Based shatter to create shards along the spline, at first I created 250 shards, however fragments near the camera looked still too big so I did a second pass adding 200 more shards with a lower width value to generate smaller fragments along the path, finally I added a PDI Uniform shatter of the whole wall to remove any too large or too narrow fragment over the surface. I follow by creating a PDI Fracture body for each wall, setting it as static, “only break” and clusterize set to 0 in PDI fracture options.
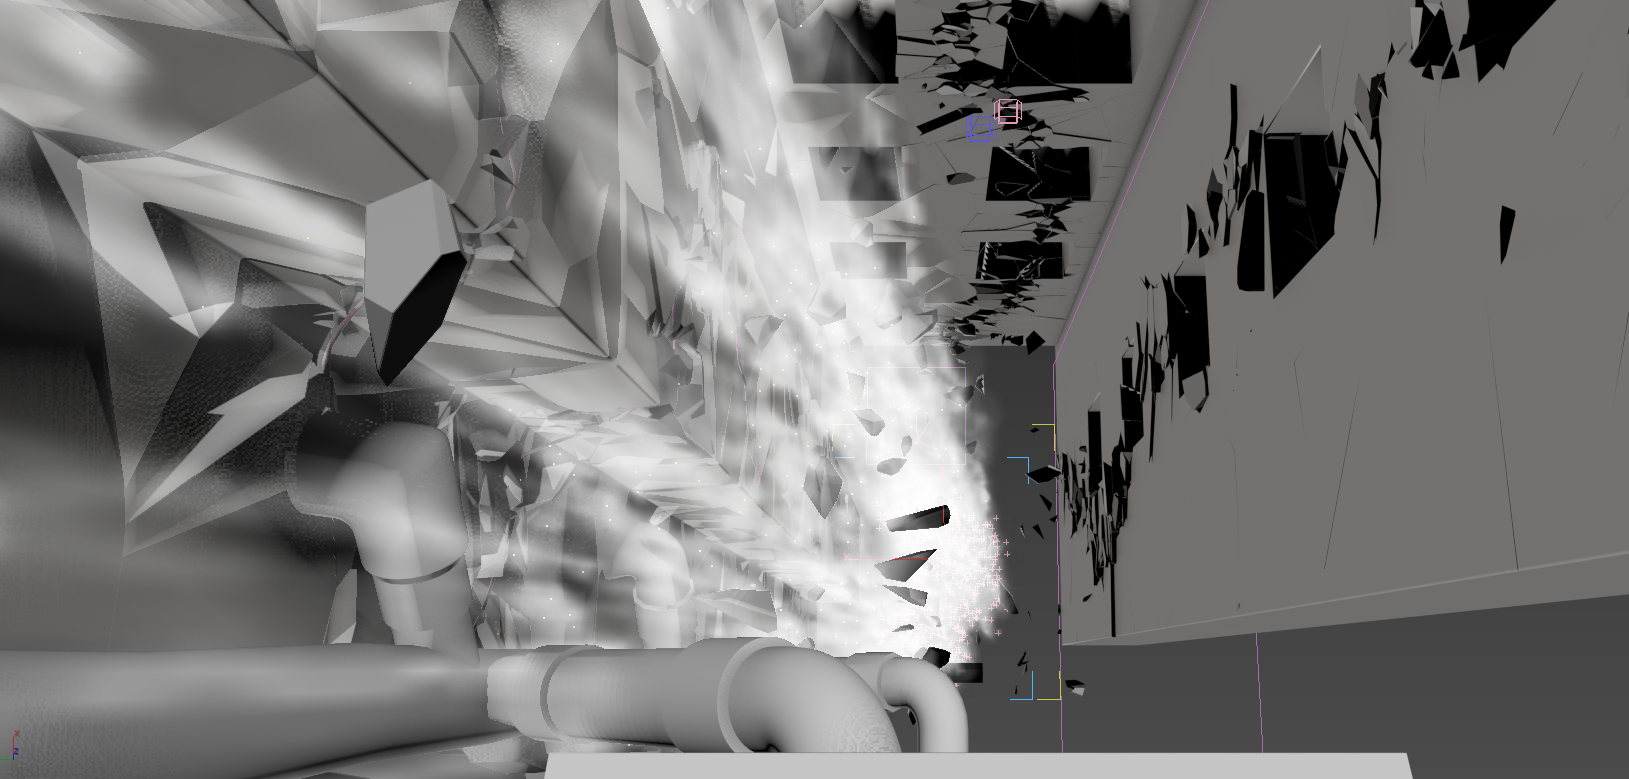
After creating a PDI cracker object following the spline trajectory and adjusted it size to be very small, when playing the simulation the wall started to crack nicely along the spline but I had to set also local propagation in PDI fracture options to prevent fragments detaching in advance.
The simulation looked good but almost all fragments along the path got detached and falling to the ground, I preferred the broken fragments to protrude over the surface without falling, but any of the PDI fracture options seemed to perform this behavior, I solved it by adding a thin box aligned to the wall but with a small gap between them, by setting it as a PDI static body I got the fragments standing after detaching, I had just to hide the thin box to get a nice protruding crack over the wall.
Exploding the wall on the left
The wall on the left crumble in a different way than the others, It explodes and crack as a whole, not just along a defined path, to achieve the effect this time I used a 3ds max wind field to trigger the destruction. First I draw a spline crossing the wall widely from left to right and making several twist in its way to the roof; then I shattered the wall using PDI path based style in around 250 shards along the spline and adding 250 more shards, setting a smallest width value, but only in the part of the wall nearest to the camera.
I followed by creating a PDI fracture body for the wall, and set it as only breaks and clusterize set to 0 in the PDI fracture parameters, I also checked affected by force fields box, I animated wind strength going from 0 to a maximum 100 units in frame 30, then decaying again until vanishing at frame 50. When running the simulation, I’ve got an appealing destruction of the whole wall, with smaller fragments being pushed out farther than bigger ones. However, I wanted most of the wall to not move at all, for achieving this I set all large chunks as static in PDI advanced fractures getting the nice exploding effect.
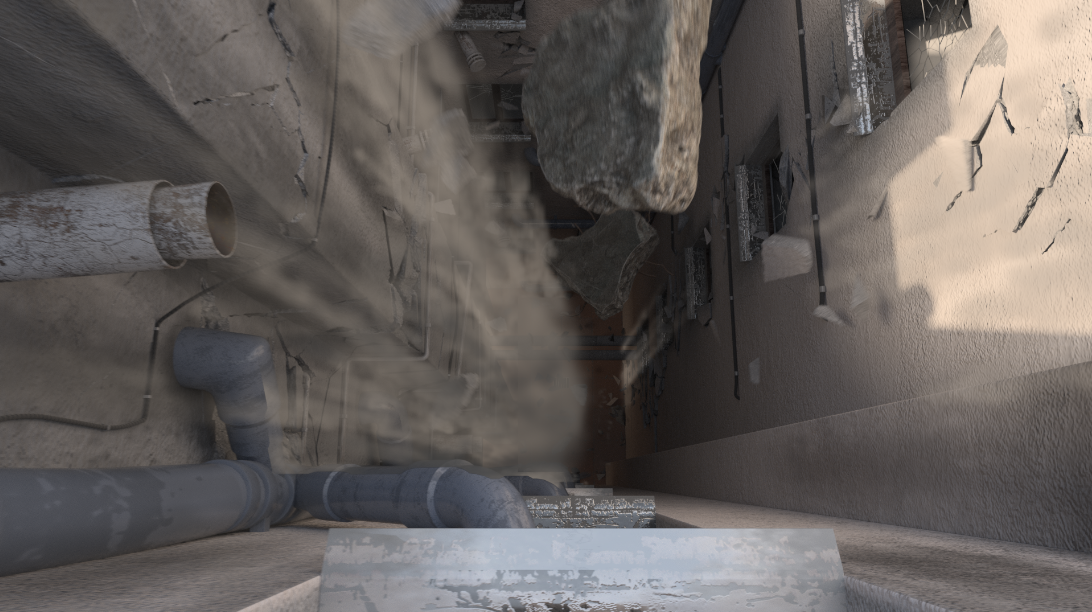
Adding more elements in simulation
At this point I had all my walls being destroyed nicely but I wanted to add more elements to make the scene more massive and impressive . I added two giant debris falling from the ceiling beyond the camera, that looked definitively good. The models were taken from a nice debris package by Everlite, I used PDI to simulate the motion of these huge pieces as rigid bodies, simply adding a random initial spin for them and gravity did the rest. Once of the chunks collides with the pipes in the ground floor so included the pipes in simulation using local shatter and setting a PDI fracture body for them, again I set the parts I didn’t want to move as static in PDI advanced fractures. Finally, I shattered some windows of the facade, for achieving this nice effect I applied a radial shatter pattern to the windows but didn’t compute dynamics for it, simply animated visibility to make the shards appearing at the exact moment.
All these new elements were added after all walls destruction was already baked, so no way to affect or modify it, however added fragments could still collide with baked geometry, that’s a very nice feature of Pulldownit when you want to add more elements to a simulation already baked.
Final Adjustments
Once all the destruction was done, I made a preview of the simulation to check dynamics and timing, I cropped keys for some fragments on the left wall to make them stick on the surface while still seeing the cracks. I had the feeling timing was a little slow , so I did all destruction a 20% faster using 3ds Max re-scale time feature which works great.
I replaced the PDI cut material for a more realistic Vray material and added PDI Jagginess to all fragments except those of the pipes as they are seeing far away, I strengthen PDI Jagginess for the fragments close to the camera which looked still too flat. Definitively close-up fragments looked much realistic after adding quite a few of roughness to them and PDI does it almost automatically and very fast, that another amazing feature of this plugin.
Finally I added a camera shake effect strengthen it when the left wall explodes and making it vanishing slowly until the end.
Adding Dust
Dust was added in a second pass using Fume Fx and I used Particle Flow in 3ds Max to guide the emission of smoke, in the left wall I set the same spline I have used to crack the surface as emitter of particles, in the other wall I emitted particles directly from the detaching fragments.
I decided to emit lot of dust from the left wall because it was kind of exploding and a soft amount of dust in the right wall to not populate the scene with too much smoke and can still see the fragments detaching and falling. I didn’t add any dust to the crack on the front wall for the same reason.
To make the particles exploding along with the fragments I simply set a pFlow speed operator with a large value and adjusted a gravity force to make particles falling quickly.
The main issue to get dust looking good was setting Fume Fx Spacing value very low, because the camera was very close to the smoke, indeed it was located inside the fluid container itself. Aside this I was testing with all Fume dissipation parameters until getting the dust behaviour I wanted for the scene. Regarding rendering I had to reduce light multiplier in FumeFx render tab to make the illumination of the smoke less brighten. I finally composed dust in Fusion adjusting Alpha gain and Burn parameters.
Conclusions
This scene involved quite a lot of elements being destroyed, I must say Pulldownit behaved fast and stable at all moment and the ability to can add more elements in simulation in different stages was very helpful to can focus in the destruction of one wall at a time.
I liked specially generating cracks along paths is very easy using this plugin, and you have fine control over the strength of the shockwaves but having more options to control the timing of the cracks propagation will be useful.
PDI Jagginess is a great feature to generate more realistic fragments adding the amount of roughness you like specially in close-up views.